Docker 101
Learn Docker basics for efficient self-hosting. Explore setup, benefits, and practical steps for seamless application deployment in this comprehensive guide.


Introduction
Welcome back, fellow self-hosting enthusiasts! In our previous journey together, we delved into the details of my self-hosted setup, took an in-depth look at Paperless, one of the many apps I run, and navigated through the basic configuration of Debian. Building upon that Debian Server foundation, we're now ready to embark on an exciting new chapter: setting up our Docker environment.
Before we plunge into the nuts and bolts of Docker installation, usage, and the magic of Docker Compose, let's take a moment to demystify Docker itself. I remember, about five years ago, spending days trying to wrap my head around Docker's concepts. It was a challenging yet enlightening journey, and with this guide, I aim to streamline your learning process, hopefully making it less daunting and more approachable.
I firmly believe that Docker, or containerization in general, is an exceptional choice for self-hosting and home labs. Self-hosting, for me, isn't just about stepping away from the clutches of big corporations; it's also about the joy of experimentation, tinkering, trying new things, and continuous learning. Docker empowers me to do all this without risking the integrity of other services or the stability of my server setup.
So, let's get ready to dive into the world of Docker, where you'll discover not only a powerful tool for your self-hosting arsenal but also a playground for your tech curiosity.
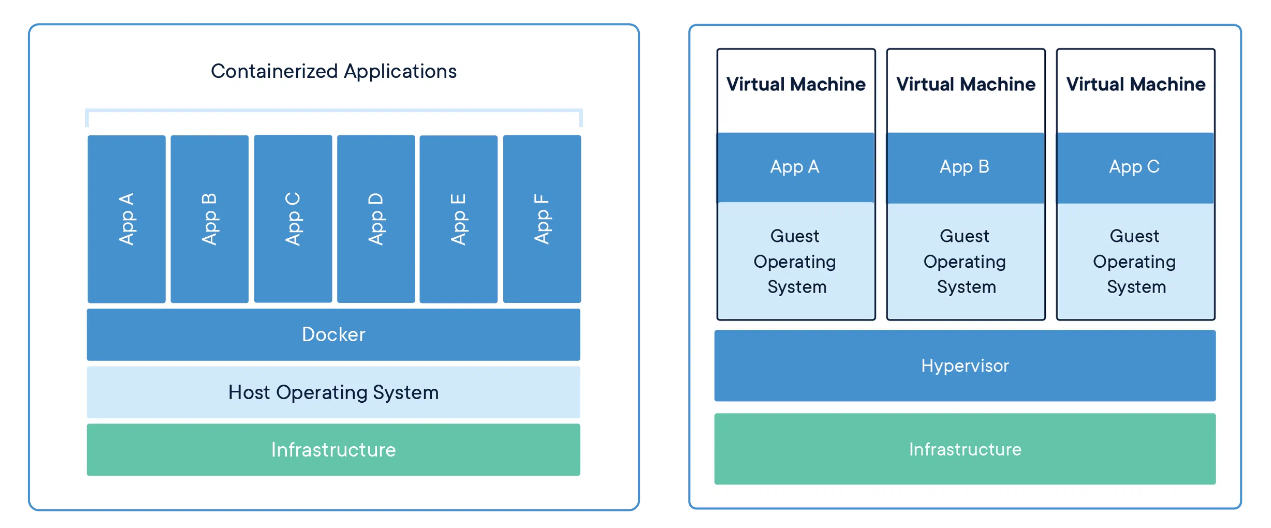
Docker Demystified: Understanding Containerization vs. Virtualization
Containers have significantly transformed the IT world in recent years and they are a superb choice for self-hosting endeavors. But what exactly do containers do? To understand this, it's helpful to start by looking at traditional virtualization.
Virtualization
Imagine you have a Debian server, and it's operating as a virtual machine on your host system (the physical server). In this setup, your virtual machine creates its own isolated area, complete with its own operating system, all while utilizing the underlying hardware of your host system. If we would want to run 15 different applications in isolation to each other, we could create 15 different vms.
Virtualization certainly has its perks. It allows you to run multiple, different operating systems on the same host system, which can be invaluable in certain scenarios. However, if your needs mostly revolve around running the same operating system for various applications, this is where the traditional approach to virtualization shows its inefficiency. You're essentially duplicating the same operating system multiple times, creating a significant amount of overhead.
Indeed, we could manage to run multiple applications on a single OS, ensuring they are as isolated as possible, but this would require considerable effort and a solid understanding of Linux. Plus, let's not forget, self-hosting for me is as much about exploration as it is about practicality. My testing often involves running something in a production-like environment for a while to assess its functionality, blurring the lines between tinkering and actual operation.
Containerization
To effectively utilize containers, an operating system is a prerequisite. In my setup, I use Debian, which itself operates as a virtual machine on my host system. To run containers within Debian, Docker is installed as the runtime environment. Unlike traditional virtual machines that require their own full-fledged operating systems, Docker containers share the underlying operating system of our Debian server. This shared use of the host OS is a key difference. While a VM encapsulates a complete OS, Docker containers only encapsulate the application and its dependencies, making them significantly more lightweight and efficient. This approach maximizes resource utilization and allows for a more streamlined and scalable deployment of applications.
The following image from Docker.com aims to visually represent this difference:
Pros & Cons of Docker for self-hosting
Docker is a great choice for self-hosting, offering a range of benefits that we'll explore. However, it's equally important to be aware of the potential downsides. Let's examine the pros and cons of using Docker in a self-hosting environment.
Pros
- Isolation: Containers operate in a way that keeps each application separate from the rest of your server. This allows you to run numerous applications on the same machine while preventing them from interfering with each other. Additionally, it becomes incredibly simple to remove an application you no longer need, leaving no residual impact on your system.
- Resource Efficiency: Containers utilize the kernel of the host system, making them more efficient and less resource-intensive than virtual machines. This enhanced efficiency leads to a more effective use of server resources, an advantage especially useful in self-hosting setups where resources might be limited.
- Security: Due to their isolated nature, Docker containers provide enhanced security against malicious applications, as they have restricted access to the host system, limiting potential harm.
- Portability: One of the standout features of containers is their portability. They are easily transferable and can be restored across different operating systems. This flexibility allows for effortless migration to different systems with minimal hassle in terms of configuration adjustments. As long as the target system supports the Docker environment, you can shift your containers to it, although some minor changes might still be necessary (like file system path).
Moreover, Docker Compose helps by documenting your configuration directly in the compose file, making management and re-deployment simpler. - Community: A key factor in my continued use of Docker has been its vast and active community. Whenever I encounter problems, solutions are typically just a Google search away, thanks to the extensive documentation and user forums. For someone who isn't an expert, this level of community support and resource availability has been crucial.
Cons
- Security: Docker and containerization don't address all security concerns. Ensuring tight access controls, safeguarding sensitive data, and using trusted container images are essential. Surprisingly, Docker operates differently from system-level firewalls like UFW and bypasses it. To maintain security, you may need to implement firewall rules at a higher level, separate from the Docker host.
- Complexity: The learning curve for Docker can be steep. It requires understanding several distinct concepts before you can use it effectively. In this guide, I aim to introduce you to the basics, hoping to significantly ease this learning process.
- Persistent Data Management: One aspect that often requires careful consideration is persistent data management. Containers are stateless, meaning they don't retain data between restarts. To address this, we need to map so called volumes from our host system into the container. This allows us to store configurations, files, and share data between the host and the container. We'll delve deeper into this topic shortly.
- Networking Complexity: Networking in Docker adds another layer of complexity that requires a solid understanding. By default, Docker creates its own network, and containers within it are not accessible from outside that network. To make containers accessible externally, additional configuration is necessary. Moreover, Docker offers various network types, each with its own pros and cons. I'll explain my choice later in the article.
- Resource Overhead: Although I highlighted resource efficiency as a pro, it's essential to note that Docker isn't entirely free from resource overhead. While it's more efficient than traditional virtualization, some level of overhead is still present. In resource-constrained environments or for resource-intensive applications, this overhead can potentially impact performance. Furthermore, certain workloads, especially those with high I/O demands, might not achieve optimal performance in containerized environments.
Conculsion
Docker proves to be an excellent choice for self-hosting, provided you can navigate its complexities. In my experience, the effort has been entirely worthwhile. The foundational system setup I've created hasn't changed in over five years. Docker allows me to effortlessly introduce new applications, expose them to the internet with just a line or two of configuration, revert them to internal use, or remove them entirely without leaving system configuration clutter behind. However, it's essential to remember that while Docker can handle a wide array of tasks, it's not a universal solution. It excels in many scenarios, but like any tool, it has its limitations.
Docker basics
In this section, we'll unravel the mysteries of Docker, laying down the essential groundwork that will empower you to master Docker and unlock its full potential for your self-hosting adventures.
Images
At the core of Docker lies the concept of images, which serve as the foundation for your containers. These images encapsulate all the essential information, files, and often configurations required for an application to operate seamlessly. You can either build your own custom images (although I won't cover that in this article) or effortlessly download pre-configured ones from repositories. While Docker Hub is the most renowned repository, alternatives like GitHub (with image URLs starting from ghcr.io) and linuxserver.io (with URLs starting from lscr.io) offer a wealth of options. If you don't plan to upload your own images, there's usually no additional configuration needed, with Docker Hub as the default choice. Images come with versioning, which do not have an enforced standard, but most following a common convention. Understanding this convention is crucial, as it helps determine the scope of changes with each update. Let's look at the a version e.g. 5.2.3:
- Major version: The first number (e.g., 5) signifies significant changes, possibly including backward-incompatible alterations or major feature additions. Upgrading the major version might entail additional steps and breaking changes. It makes sense to check the release notes prior an upgrade.
- Minor version: The second number (e.g., 2) introduces backward-compatible feature additions, improvements, or enhancements. It typically expands on existing features without breaking compatibility.
- Patch version: The third number (e.g., 3) indicates backward-compatible bug fixes, corrections, or minor enhancements. Incrementing the patch version means resolving issues and enhancing the image without introducing new features or breaking changes.
Understanding these versioning principles ensures you choose the right image for your needs and maintain compatibility with your applications.
In addition to versioning, you'll often come across a tag called latest within Docker repositories. When you don't specify a particular image version to use, Docker defaults to latest. I personally find it beneficial to still set latest (when I don't use a specific verison) for my images as a convenient way to identify and reference them in my configuration. The use of latest streamlines management, making it easier to work with images without constantly specifying version numbers. However, it's essential to exercise caution when relying on latest, as it may not always align with your specific requirements or ensure version consistency across your environment.
In my Docker setup, I often use the latest tag for applications. However, I take a more cautious approach with critical elements like databases, authentification service and my reverse proxy. These vital components are assigned specific version tags to ensure stability and compatibility, particularly during updates when I might not be available to address issues promptly. My choice depends on whether I can risk potential disruptions or compatibility problems when updates occur.
It's important to note that during updates, developers typically update not only the specific release tag but also major and minor version tags. For example, if you're using version 5.2.3, it won't auto-update to 5.2.4. However, containers with "latest," "5," or "5.2" tags will receive the update. This flexible tagging approach allows users to choose the level of version granularity that suits their needs.
Additionally, when searching for Docker images in a repository, I prioritize those that offer an alpine version. Alpine images are built on Alpine Linux, known for their minimalistic design, security focus, and resource efficiency. These images are typically smaller in size and consume fewer resources, making them an excellent choice to maintain a lean and efficient Docker environment.
When inspecting a new container, my first step is to examine its tagging strategy. After doing so a few times, it becomes a quick habit that takes just a minute or two.
Networking
Instead of relying on Docker's default network, I prefer to create custom networks for my containers. This practice grants me greater control and enables stricter isolation between containers. Let us have a look at the different options we have to choose from:
- Bridge Network: Docker's default network mode that creates an internal private network, allowing containers to communicate with each other using internal IP addresses. This is what I mainly use.
- Host Network: Containers share the host's network stack, making them accessible directly on the host's network (most likely your home network). This mode offers optimal network performance but may limit isolation.
- None Network: Isolates containers from external networks completely, useful for security and testing purposes.
- Overlay Network: Used in Docker Swarm, it facilitates communication between containers across different hosts, creating a virtual network that spans multiple nodes. (not covered in this article)
- Macvlan Network: Provides containers with a unique MAC address, allowing them to behave like physical devices on the network, useful for scenarios requiring direct network access. (not covered in this article)
- IPvlan Network: Similar to Macvlan, it allows containers to connect directly to physical networks, but with different characteristics suited to specific use cases. (not covered in this article)
The bridge network is the most commonly used network mode in Docker. What's important to understand is that you can create multiple bridge networks to achieve more isolation. Containers can be assigned to one or more of these networks, allowing them to communicate across different networks. We'll delve into setting up specific networks later when we cover Docker Compose.
The host network mode places your container directly on the same network as your host system. Containers using this mode don't receive separate IP addresses; they share the host's network stack. This setup is valuable for scenarios where you want containers to be easily discoverable on the network, such as in smart home setups (e.g., Home Assistant) or media servers (e.g., Jellyfin).
The none network mode serves a valuable purpose in Docker when dealing with applications that don't require network access. In cases where a container performs periodic calculations and writes results directly to disk without the need for external network communication, the "none" network mode is a good choice. While I don't currently have such a scenario in my homelab, it's a useful option for specific use cases that prioritize isolation from the network.
Persistent storage
It's vital to grasp that containers are inherently stateless, meaning they retain only the information shipped with their image. Any configurations, uploads, changes, or data created within a container will be lost unless we implement proper persistence mechanisms. This aspect is crucial to understand in Docker.
In our exploration of achieving persistence, we'll primarily focus on bind mounts. This technique involves mounting a folder or file from your server's directory directly into the container, ensuring that data remains intact across container restarts and updates.
Additionally, it's worth noting that using named volumes provides an even more versatile option. With named volumes, it becomes possible to directly mount an NFS share from your NAS into the container, offering seamless integration with external storage solutions. But this will be for another article.
Setup Docker & Docker Compose
Before we dive deeper into the details of Docker and Docker Compose, let's ensure your server environment is ready to go. In this setup phase, we'll prepare your server to execute and experiment with various Docker commands and code snippets. Whether you're using a physical server, a virtual machine, or a cloud instance, having Docker installed and configured correctly is essential for the next steps. So, let's get your server up to speed and ready to explore the world of Docker.
Installing Docker
Setting up Docker is relatively straightforward. We'll be adhering to the official guidelines provided in the Docker documentation. For your convenience, I'll also outline the essential steps right here in our guide.
Assuming you've followed my Debian guide, we should already be starting from a clean state. However, to ensure everything is set up perfectly, let's take a moment to remove any old or unnecessary components before proceeding with the Docker setup:
for pkg in docker.io docker-doc docker-compose podman-docker containerd runc; do sudo apt-get remove $pkg; doneThe next phase involves a few equally important tasks: updating the system, installing essential packages, and adding the appropriate repository to our system. Each of these steps plays a vital role in setting a solid foundation for Docker installation:
sudo apt-get update
sudo apt-get install ca-certificates curl gnupg
sudo install -m 0755 -d /etc/apt/keyrings
curl -fsSL https://download.docker.com/linux/debian/gpg | sudo gpg --dearmor -o /etc/apt/keyrings/docker.gpg
sudo chmod a+r /etc/apt/keyrings/docker.gpg

# Add the repository to Apt sources:
echo \
  "deb [arch=$(dpkg --print-architecture) signed-by=/etc/apt/keyrings/docker.gpg] https://download.docker.com/linux/debian \
  $(. /etc/os-release && echo "$VERSION_CODENAME") stable" | \
  sudo tee /etc/apt/sources.list.d/docker.list > /dev/null
sudo apt-get update
It's now time to install the Docker Engine:
sudo apt-get install docker-ce docker-ce-cli containerd.io docker-buildx-plugin docker-compose-pluginThe official documentation suggests adding your user to the Docker group. However, I recommend against this. Instead, always use 'sudo' for your Docker commands. This maintains an important layer of security on your system.
Let's configure Docker to automatically start on system reboot, ensuring consistent availability of the service.
sudo systemctl enable docker.service
sudo systemctl enable containerd.service
To prevent issues with oversized logs, which I've encountered before, it's important to set up log rotation. To do this, create or modify the file /etc/docker/daemon.json and add the necessary configurations. This will help manage log sizes efficiently.
{
  "log-driver": "json-file",
  "log-opts": {
    "max-size": "100m",
    "max-file": "3"
  }
}
By modifying the Docker configuration, logs will be rotated after reaching 100 MB, and only the two most recent versions + active one will be kept, avoiding the issue of unlimited log growth in the default setup.
sudo systemctl restart docker.service
sudo systemctl restart containerd.service
Setting up Docker Compose
We can start Docker containers with the docker run command, but there's a big downside. It's just a command, so we need to remember (or document) everything we've done. Docker containers can need a lot of configuration info, and all of it has to be in the command.
Docker Compose, on the other hand, is the complete documentation of our entire environment. From network configuration, secrets, volumes, and all the details of our applications, it's all in the Docker Compose file(s). Let's install it first!
sudo apt install docker-compose-pluginTo make sure everything is installed correctly, we can check it with:
sudo docker compose versionYou should see a response with the Docker Compose version.
Creating our Docker Environment
Now, let's start setting up our Docker environment. We'll go through the configuration step by step.
File Creation
First, we need to create the necessary files. We'll start with the .env file, which stores key information that we'll reuse across containers or keep out of our Compose file for security reasons. Remember, the .env file should never be checked into a repository and must be kept safe.
Next, we'll create the Docker Compose file, which we'll configure shortly. Personally, I like to create a directory /server/docker where I store my environment and persistent data.
touch .env
touch docker-compose.yml # you can also just name it compose.yml
One more hint: remember that YAML (YML) files are very sensitive to spaces. The indentation of the different sections needs to be perfect.
.env file
Think of the .env file as your app's cheat sheet—a plain ol' text file with some serious mojo! It's where we stash all the goodies: settings, passwords, and other juicy bits. Why ".env"? It's short for environment, because it stores your environment variables.
## General
DOCKERDIR=/server/docker
PUID=1000
PGID=1000
TZ=Europe/Berlin
Let's start with the basics:
DOCKERDIR: This is now set to my standard path,/server/docker. Simple and to the point.PUID: Stores the ID of my user on the Linux server.PGID: Holds the group ID of my user group on the Linux server.TZ: Defines the time zone I want to use.
One of the beauties here is the flexibility. If I decide to relocate my stack to a different path or adjust those IDs, it's a breeze—simply update the .env file! There's no need to delve into each of those potential 50 containers.
Just choose any name you like for the variable on the left, add an equal sign, and then the value. Need to handle special characters, like '#'? Simply enclose them in single quotes like this: ''#MyValue".
In your Docker Compose file, you can reference all the variables you've defined in the .env file. Simply type a dollar sign $ followed by the exact name of the variable (the left side of the equals sign).
Networks in Docker Compose
First order of business: setting up our docker networks. Fire up sudo docker network ls and voila! You'll notice there are networks already buzzing around. Now, I'm all about crafting my own networks rather than riding on the default ones. Why? Because I like being crystal clear about what I'm using and keeping the reins tight. Let's dive in!
networks:
  frontend:
    name: frontend
    driver: bridge
  backend:
    name: backend
    driver: bridge
I'm whipping up two networks here. First up, we've got "frontend," a bridge network. Then there's "backend," also a bridge network. Here's my rule of thumb: anything that has a UI gets on the frontend network. Meanwhile, all those behind-the-scenes supporting services? They're on the backend network. From a security standpoint, this setup won't exactly turn Fort Knox green with envy. If you're serious about security, you'll wanna go the extra mile, creating a network for each service and its entourage to max out that isolation level.
Creating our Services
Let's begin setting up some services, focusing on the Docker aspects using details from the Paperless article. If you need specific configuration details for the Paperless variables, feel free to refer to the article for more clarity.
services:
  service_name:
    container_name: ...
    image: ...
    restart: ...
    networks:
      ...
    ports:
      ...
    security_opt:
      - no-new-privileges:true
    depends_on:
      ...
    volumes:
      ...
    environment:
      ...
Let's kick off setting up our services by introducing the services section. Then, indented by a two of spaces or a tab, we provide a name for our service. Further indented by the same amount, we configure our service following a consistent pattern:
container_name: Something easily recognizable to identify the container.image: Specifies the image we want to use.restart: Determines the restart policy (I always opt for 'unless-stopped').networks: Lists the networks the container should have access to.ports: If the container needs to be accessible from outside the Docker network, we map a port from our host machine to the container's port.security_opt: I always include the settingno-new-privileges:truefor security. It prevents processes in the container from gaining new privileges after they start. This reduces the attack surface and limits the impact of security vulnerabilities. Only change this setting if you fully understand the implications and trust the source.depends_on: Specifies containers, like databases, that this container relies on. If not applicable, delete this section.volumes: Indicates persistent volumes, if needed, by mapping the corresponding folder from our host to the container.environment: The crucial configuration of the container. We need to consult the container's documentation to understand which variables can be used to configure the container upon startup.
Let's examine an example configuration for the Paperless containers.
services:
  paperless:
    container_name: paperless
    image: ghcr.io/paperless-ngx/paperless-ngx:latest
    restart: unless-stopped
We're naming our service 'paperless' and the container_name will also be 'paperless'. We're fetching the image from 'ghcr.io/paperless-ngx/paperless-ngx:latest', utilizing the GitHub repository for this purpose. As for the restart policy, it'll stick to my default 'unless-stopped' setting.
    networks:
      - frontend
      - backend
    ports:
      - 8080:8000
    security_opt:
      - no-new-privileges:true
    depends_on:
      - paperless-redis
      - paperless-postgres
The Paperless container will be connected to the 'frontend' and 'backend' networks for access. Externally, it will be reachable on port 8080, which is mapped to its internal port 8000. We've added a security option to limit new privileges. Furthermore, we've noted dependencies on PostgreSQL and Redis services, which we'll configure in the following steps.
    volumes:
        # Docker container data
      - $DOCKERDIR/paperless/paperless/data:/usr/src/paperless/data
        # Location of your documents
      - $DOCKERDIR/paperless/paperless/media:/usr/src/paperless/media
        # Target for backups
      - $DOCKERDIR/paperless/paperless/export:/usr/src/paperless/export
        # Watch folder
      - $DOCKERDIR/paperless/paperless/consume:/usr/src/paperless/consume
    environment:
      USERMAP_UID: $PUID
      USERMAP_GID: $PGID
      PAPERLESS_TIME_ZONE: $TZ
      ...
When mapping volumes in Docker Compose, the left side represents the path on the host machine, and the right side represents the path within the container. The $DOCKERDIR variable stands for /server/docker, making the configuration more flexible. You can technically map the root directory of the container /, but it’s generally better to map specific directories to maintain clarity and security.
Ensure you check the container documentation to understand where the data you want to persist is located. If the specified host path does not exist, Docker will create it. Similarly, Docker will create the specified directory within the container if it doesn’t exist.
Additionally, environment variables defined in our .env file are referenced in the docker-compose.yml (or your compose.yml) file, keeping configurations clean and easily manageable. You can see here the first few environment variables of Paperless-ngxbeing set.
Now, let's take a quick look at the other two services we need to run our Paperless-ngx instance.
  paperless-postgres:
    container_name: paperless-postgres
    image: postgres:16.0-alpine #fixedVersion
    restart: unless-stopped
    networks:
      - backend
    security_opt:
      - no-new-privileges:true
    volumes:
      - $DOCKERDIR/paperless/postgres:/var/lib/postgresql/data
    environment:
      POSTGRES_USER: DBUSERNAME
      POSTGRES_DB: DBNAME
      POSTGRES_PASSWORD: $DBPASSWORD

  paperless-redis:
    container_name: paperless-redis
    image: redis:7.2-alpine #fixedVersion
    restart: unless-stopped
    networks:
      - backend
    security_opt:
      - no-new-privileges:true
    volumes:
      - $DOCKERDIR/paperless/redis:/data
    environment:
      REDIS_ARGS: "--save 60 10"
You can see the same pattern here again, with details differing according to the service we need.
For your benefit, here is the full setup. However, please note that the database parameters and other details still need to be adjusted to your specific needs.
networks:
  frontend:
    name: frontend
    driver: bridge
  backend:
    name: backend
    driver: bridge

services:
  paperless:
    container_name: paperless
    image: ghcr.io/paperless-ngx/paperless-ngx:latest
    restart: unless-stopped
    networks:
      - frontend
      - backend
    ports:
      - 8080:8000
    security_opt:
      - no-new-privileges:true
    depends_on:
      - paperless-redis
      - paperless-postgres
    volumes:
        # Docker container data
      - $DOCKERDIR/paperless/paperless/data:/usr/src/paperless/data
        # Location of your documents
      - $DOCKERDIR/paperless/paperless/media:/usr/src/paperless/media
        # Target for backups
      - $DOCKERDIR/paperless/paperless/export:/usr/src/paperless/export
        # Watch folder
      - $DOCKERDIR/paperless/paperless/consume:/usr/src/paperless/consume
    environment:
      USERMAP_UID: $PUID
      USERMAP_GID: $PGID
      PAPERLESS_TIME_ZONE: $TZ
      PAPERLESS_OCR_LANGUAGE: deu+eng
      PAPERLESS_ENABLE_UPDATE_CHECK: "true"
      PAPERLESS_REDIS: redis://paperless-redis:6379
      PAPERLESS_DBHOST: paperless-postgres
      PAPERLESS_DBNAME: DBNAME
      PAPERLESS_DBUSER: DBUSERNAME
      PAPERLESS_DBPASS_FILE: /run/secrets/paperless_db_paperless_passwd
      PAPERLESS_DBPASS: $PAPERLESS_DBPASS
      PAPERLESS_SECRET_KEY: $PAPERLESS_SECRET_KEY
      PAPERLESS_FILENAME_FORMAT: "{created_year}/{correspondent}/{created} {title}"
      PAPERLESS_URL: "<YOUR PAPERLESS URL>"
      PAPERLESS_ALLOWED_HOSTS: PAPERLESS_URL
      PAPERLESS_ADMIN_USER: "<ADMIN USER>" # only needed on first run
      PAPERLESS_ADMIN_PASSWORD: "<ADMIN PASSWORD>" # only needed on first run

  paperless-postgres:
    container_name: paperless-postgres
    image: postgres:16.0-alpine #fixedVersion
    restart: unless-stopped
    networks:
      - backend
    security_opt:
      - no-new-privileges:true
    volumes:
      - $DOCKERDIR/paperless/postgres:/var/lib/postgresql/data
    environment:
      POSTGRES_USER: DBUSERNAME
      POSTGRES_DB: DBNAME
      POSTGRES_PASSWORD: $PasswordFromEnvFile

  paperless-redis:
    container_name: paperless-redis
    image: redis:7.2-alpine #fixedVersion
    restart: unless-stopped
    networks:
      - backend
    security_opt:
      - no-new-privileges:true
    volumes:
      - $DOCKERDIR/paperless/redis:/data
    environment:
      REDIS_ARGS: "--save 60 10"
Docker / Docker Compose Commands
Last but not least, let's review the most important Docker commands and I'll share some tips. I also encourage everyone to not be afraid to explore the help section of a new command. This is a common practice for me, and I learn a lot by doing so. However, don't get me wrong—I don't always understand everything I see. Most Linux commands have a help, -help, or --help option you can append to the command to get more details.
Firstly, we can utilize the docker ps command to display all our containers along with information such as uptime, used image, status, etc. I always add the -a option to also view stopped containers.
sudo docker ps -aWhen we are in the same directory, where our docker compose file is, we can use the docker compose command. You can also use the docker compose command from elswhere, but then you need to specify the file to be used. With docker compose up we can have everything created or started. This includes networks, volumes, ... everything that is defined in your compose file.
If you run the command after adjusting one service or adding a new one, only the changed part or added part will be (re-) created. The rest will be untouched. You will want to add -d after the command to run in detached mode. In the Linux console, detached mode means the command runs in the background, allowing you to continue using the terminal for other tasks.
One more addition will be --remove-orphans. This ensures that anything removed from our Docker Compose file, such as a service or a network, is also removed from our environment.
sudo docker compose up -d --remove-orphansTip: If you've added or changed multiple services in your compose file but only want to recreate specific ones, just list their names at the end of the command. Use the service names defined in your compose file.
sudo docker compose up -d service1 service2 ...Another important command to know is the docker compose down command. This stops all services and removes everything you've created. If you are not using bind mounts as we have in this guide and have decided to created volumes, you will need to add --volumes to remove them as well. Although I rarely use this command without specifying a specific service, it can be very helpful.
sudo docker compose downTip: We can also specify the services here, just as we did before. This allows you to stop and remove only the specified services.
sudo docker compose down service1 service2 ...When it comes to updating our environment, by updating I mean getting the latest images, we can use the docker compose pull command. It's crucial to understand image versioning and what you have set in your compose file. With docker compose pull, Docker checks every referenced image for a new version and downloads it if available (only downloads, doesn't update containers).
Personally, I prefer not to use services like Watchtower, which periodically check for updates and restart services to use the newest image. I've have encountered bugs in new images, prompting me to revert to an older version and wait for the bug to be fixed. I don't want this to happen when I'm not available to address issues. I prefer to handle updates manually, ensuring I have time to investigate and resolve any problems.
sudo docker compose pullAlright, now that we've downloaded new images using docker compose pull, let's apply them to our Docker environment using the command we're already familiar with: docker compose up -d --remove-orphans.
Last but not least, once we've updated our service, we want to tidy up the system afterwards and delete anything that's no longer needed. This could include old images, containers, etc. For this task, we'll use docker system prune.
I always add -af to the command. a stands for all, which removes all parts of unused Docker artifacts, and f disables the system prompt, which would otherwise require confirmation for deletion.
sudo docker system prune -afAll right, we now know the most important commands we need while working with Docker and Docker Compose. When I want to run an update, I use the following commands in this sequence to update the system. I could combine them or even put them into a shell script, but I prefer to see what is happening so I can investigate issues more quickly.
sudo docker compose pull
sudo docker compose up -d --remove-orphans
sudo docker system prune -af
Conclusion
In conclusion, Docker proves to be an exceptional tool for self-hosting, offering a myriad of benefits for enthusiasts and professionals alike. While Docker simplifies the deployment and management of applications, it's essential to acknowledge and navigate its complexities effectively. Through diligent exploration and understanding, users can harness Docker's power to build robust, efficient, and scalable self-hosting environments.
My journey with Docker has been marked by continuous learning, experimentation, and growth. Leveraging Docker, I've maintained a stable and versatile server setup for over five years, seamlessly integrating new applications and services into my environment. Docker's ability to encapsulate applications and their dependencies in lightweight containers has revolutionized the way I approach self-hosting, empowering me to explore new technologies and expand my skill set.
However, it's crucial to recognize that Docker isn't a one-size-fits-all solution. While it excels in many scenarios, it's not without its limitations. Users must carefully evaluate their requirements and consider factors such as security, complexity, and resource management when leveraging Docker for self-hosting projects.
Despite its challenges, Docker offers unparalleled flexibility, efficiency, and scalability, making it an indispensable tool for modern self-hosting enthusiasts. By embracing Docker and mastering its intricacies, users can unlock a world of possibilities for their self-hosting adventures, propelling them towards new heights of innovation and productivity.