A Clutter-Free Life: Going Paperless with Paperless-ngx
Explore Paperless-ngx, the game-changer in document management. I'll take you through my adoption journey, Docker setup, and why it's 100 times better than paper filing. Say goodbye to paper chaos!


Introduction
In my previous article, I provided a comprehensive overview of my homelab. If you haven't had a chance to read it yet but are interested, you can find it at here. In the upcoming articles, I'll delve into detailed guides on how to create a homelab like mine. However, from time to time, like now, I like to shift the focus and spotlight a service or project I'm particularly fond of.
In this article, I'll explore what Paperless-ngx (we'll call it Paperless for short) is and the benefits it offers. I'll also share how I've structured my Paperless installation. Finally, I'll provide my code for you to use in setting up your own instance. For now, I'll assume you already have a functional Docker environment ready to deploy your Paperless instance.
Introducing Paperless-ngx, your key to simplifying life by going digital! Are you tired of hunting for crucial documents when doing your taxes? With Paperless, that hassle is a thing of the past. This fantastic tool has built-in OCR (Optical Character Recognition) and learns from your categorized documents, making it a breeze to organize your files. Say goodbye to endless diggin through folders – now, all your essential documents are just a few clicks away. Once you've given Paperless a try for a while, you'll find that it consistently gets things right, reducing the need for manual adjustments. Say hello to a more streamlined and efficient way of managing your documents!
The big benefit of going digital in this space? Flexibility! Unlike traditional paper-based or folder-organized digital systems, your documents can belong to multiple categories at once. Ever wrestled with the dilemma of deciding which folder a document should go into? That's because it often fits more than one category. The solution? Tags. With a digital solution like Paperless, you can assign as many tags as you need, making categorization a breeze. Say goodbye to the folder confusion!
Paperless: A Living Proof of Open Source Greatness
In short: Paperless transitioned into Paperless-ng and then into Paperless-ngx
Paperless was initiated by Daniel Quinn, with his initial commit to the GitHub project dating back to 6th June 2016. The version 1 release came on 3rd July 2018 (with the first release, 0.3.0, launched on 1st January 2017). The last release under Daniel Quinn's was on 27th January 2019.
As the original project began to lose momentum, Jonas Winkler's fork Paperless-ng emerged as the official successor. The first release (0.9) occurred on 18th November 2020, and the final release before the current transition was on 22nd August 2021.
At the time of writing this, Paperless-ngx is the official version and repository, having its inaugural release on 05th March 2022.
This journey exemplifies the strength of the open-source community. Even if a project experiences slowdowns or transitions, passionate contributors ensure its legacy lives on and continues to evolve.
My Paperless Story
Efficiency Unleashed
Let's explore Paperless and my adoption of it. There are various approaches to adopting it, so find what suits you best. What works for me might just be the right fit for you too, or you might discover your own path along the way.
Here are the key feature of Paperless:
- Document Management: Organize and manage your digital documents efficiently in the web.
- Tagging System: Easily categorize documents with tags for quick access.
- OCR Integration: Optical Character Recognition for extracting text from images and scanned documents.
- Automatic Categorization: Learns from your tags and categories to auto-classify future documents.
- Search Functionality: Powerful search capabilities to find documents swiftly.
- Multi-User Support: Collaborate with others by setting up multiple user accounts.
- Data Export: Export your documents and data for backup or migration purposes. They are also kept in a very neat folder structure and naming convention, enabling you to ditch Paperless without any effort.
From Paper to Pixels: Which Documents Belong in Your Digital Vault?
I'm in Germany, so these rules may not apply to you. Always do your own research. I am only sharing what I am doing and not advising you to do the same.
Generally, I digitize what I'd put in a physical folder, which is not every letter from banks, insurers, etc.
The next choice is whether to keep the physical copy or go digital only (make sure you have a proven backup solution). In Germany, you must keep physical copies of certificates, notarized docs, property papers, vehicle papers, specific financial docs (contract-related, not just statements), insurance policies, passports, and ID cards. I shred and dispose of any document that don't require a physical copy. Fortunately, many documents are digital these days, saving me from making that decision and scanning them.
Tagging, Document Types, and Correspondents: My Organizational Secrets
To stay organized and efficient, it's crucial to consider document types, tags, and correspondents.
Correspondents
This part is straightforward. Every sender of documents you upload to Paperless becomes a correspondent. You can add new correspondents on the fly when you review new documents.
I do make exceptions; for instance, invoices from online shops are assigned to 'Online Shops' rather than having their own correspondent. Thanks to the full-text search, finding what I need is easy within the hundreds of documents in the system.
Document Types
I put a lot of thought into document types when setting up Paperless, but rarely ever need them. Although I don't use them often, they don't hurt as Paperless is self-learning.
Here are the types I've set up:
- Invoice
- Letter
- Insurance
- Contract
- Other
Tags
Remember what we discussed earlier? Folders, whether they're physical or digital, limit us to just one category per document. Tags give us the power to assign multiple categories to a single document. So, go ahead, be a tagging superstar and create as many categories as your heart desires (and even assign them all to one document). It's your very own organizational playground!
In my experience, simplicity beats complexity. Keep it straightforward, no need for over-detailing. Plus, we've got this fantastic search feature to help you find what you need in a snap!
Now, let's dive into the magical world of tags.
Who's Affected?
I find it helpful to use distinct tags for the people the documents affect:
- Wife
- Me
- Family (for example all bills around the house, shared insurances, ...)
Which Categories Are Affected?
I also like to create specific groupings to easily access all related documents.
- Car (You could also create a tag per car you own.)
- Doctor
- Expenses
- House (Have more real estate? Create a tag per property.)
- ToDo (Will cover this later.)
Navigating Tax Season: Organizing Your Tax-Related Papers
For a smooth tax season, I rely on my tax tags, which make finding relevant documents a breeze.
- Tax (A general tag for all tax relevant documents.)
- Tax always (I have documents, which are relevant for every year.)
- Tax 2021
- Tax 2022
- Tax 2023
- ...
Documents like insurance papers, which are relevant for more than one year, usually have three tax tags: the general one and the two for the years they are relevant for.
Digitalization Made Easy: Uploading to Paperless-ngx
Now that everything is set up for organizing our documents, you might wonder how to get them in there. It's a straightforward process, with three simple methods (not counting potential mobile apps as a fourth option).
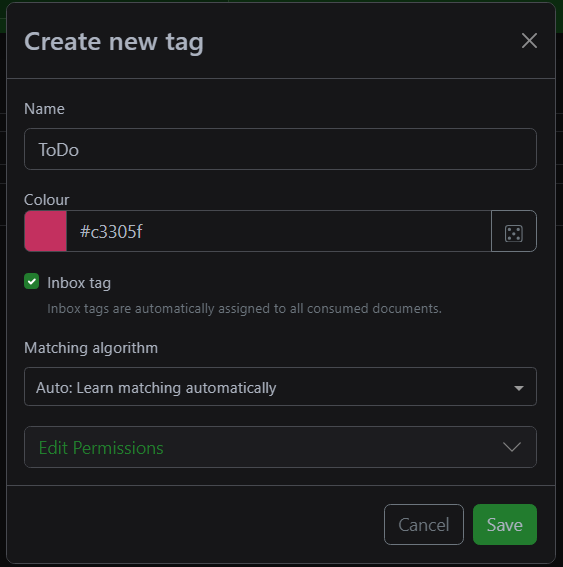
This is also where the 'ToDo' tag comes into play! Make sure, when you create the tag, that you tick the 'Inbox tag' box.
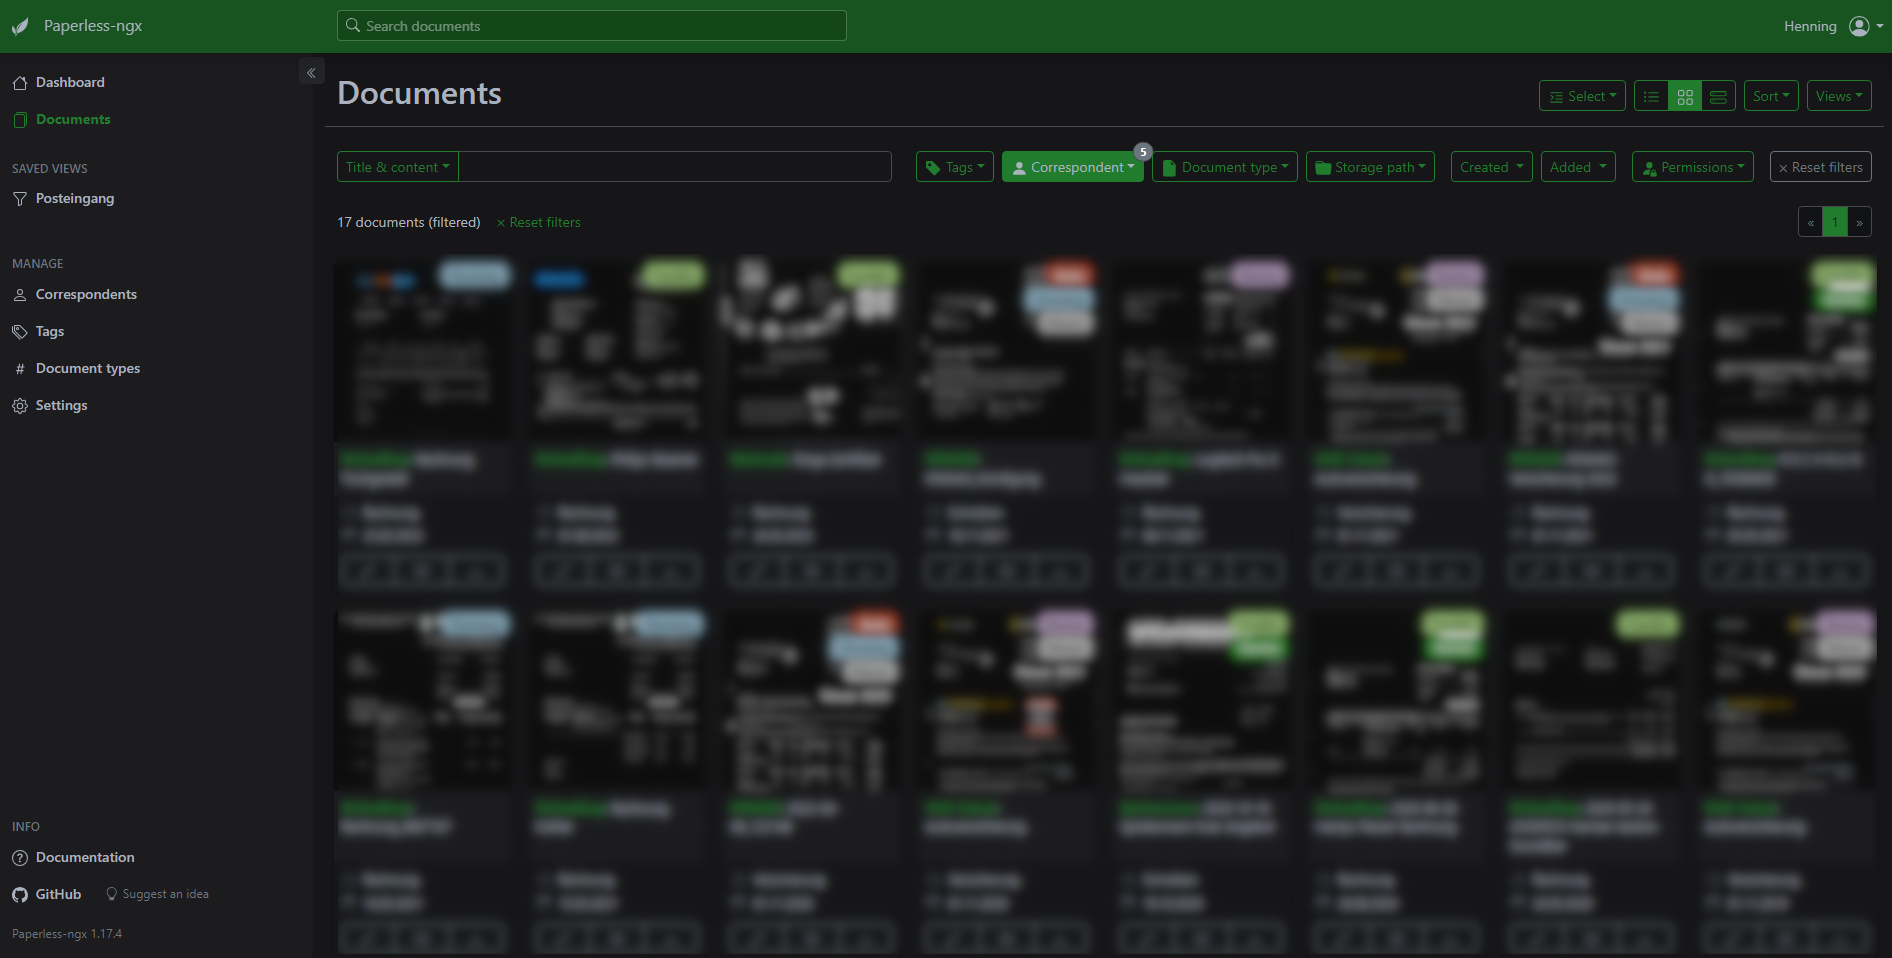
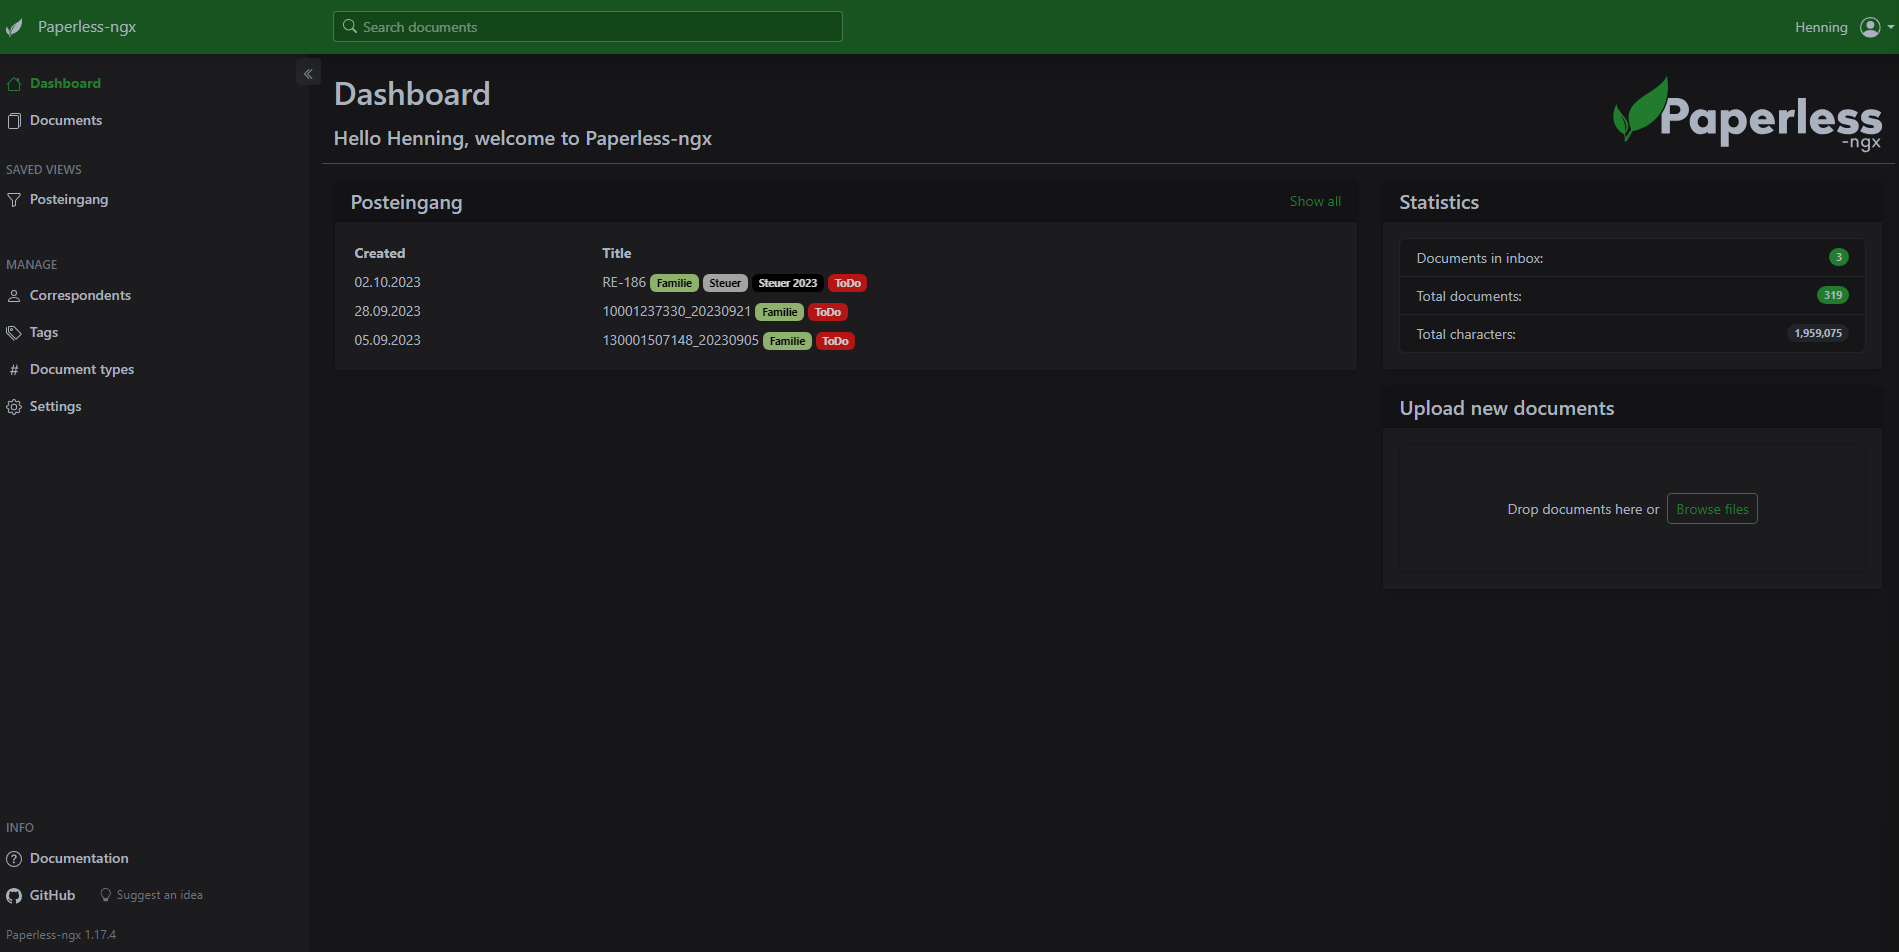
Regardless of how the documents are imported into Paperless, the ToDo tag is set. I have created a so-called 'view', which displays all documents with the ToDo tag, and added that view to my homepage. This is essentially my inbox in Paperless, which I go through from time to time to check if everything is set correctly.
Uploading
In your web browser, click the upload button, select your file(s), and click upload. For an even easier method, just drag and drop your file(s) into the Paperless browser window, no matter where you are in Paperless. It's that simple!
Email Inbox
You can have Paperless periodically scan a specific email inbox and import files from there. It could be your standard inbox, and you watch for a certain topic or folder, or you just set up a new inbox and forward emails with documents you want to import to that inbox. This is what I do, and let's have a quick look at how to set that up.
After you have added an email inbox to monitor in the settings, you can specify what the importer will actually watch for and do.
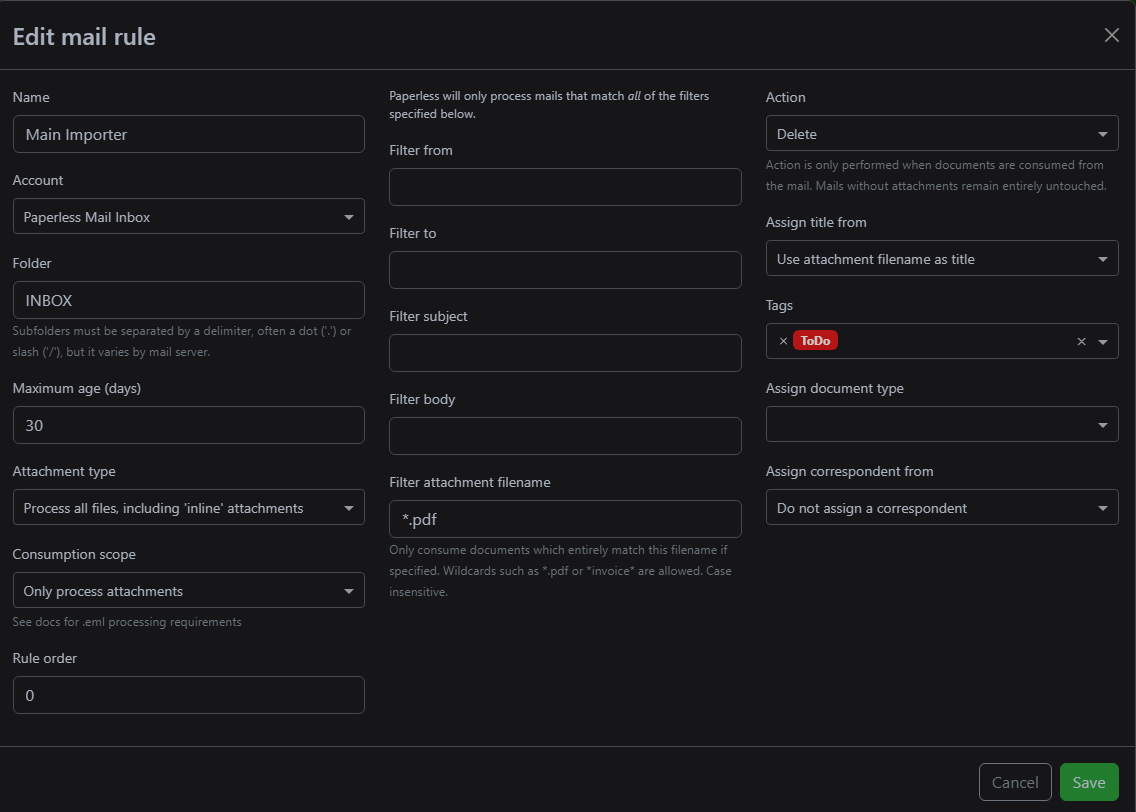
What you can see in the picture above is that my rule 'Main Importer' will import from 'Paperless Mail Inbox' (the name I gave the configuration of the email inbox to monitor). It watches the folder 'INBOX', processes all PDF documents, uses the file's name as the document name, sets the 'ToDo' tag, and deletes the email.
Don't worry about the 'Do not assign a correspondent' option; this actually means that the self-learning algorithm will try to set the correct correspondent.
Auto import from a folder
You can also have Paperless watch a specific folder and import all documents from there. This is especially useful if you already have many digital documents you want to import initially or if you have a scanner with the ability to scan to a network share.
Effortless Editing: Perfecting Your Documents
Paired with the OCR process and the self-learning algorithm, editing newly added documents is very easy and fast. Remember, though, that the self-learning algorithm needs to learn from your documents. Any new correspondent will definitely be wrong, as it will try to set a known correspondent. After some time, it will become a matter of just making sure everything is correct.
The title is something I neraly always redo, to make it very meaningful, in order to identify the document very quickly.
I have learned that it is tricky to set the right date. There are a few to choose from (dates from the files meta data, dates in the header, or any other dates mentioned in the document). It gets it right most times, but do pay attention to it.
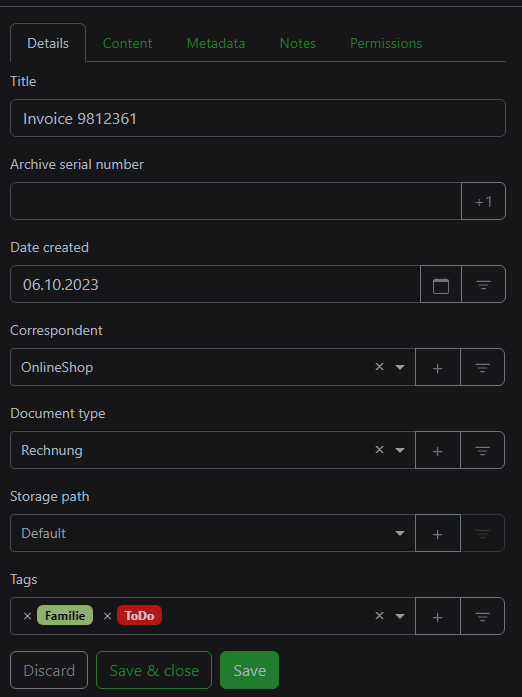
In the above screenshot, you can see a freshly imported document, which I can now check if everything is correct. Is it a new correspondent? No need to leave the window; you can create it straight from the input field here, same for the Document Type and Tags.
The archive serial number can also be very useful (I don't use it). The serial number will automatically count upwards by one from the last serial number used. You can then write this number on the physical document and just put it in a folder, without any extra organization. Are you now looking for a document, just look up the serial number, identify the folder, ...
The last step when I am done is removing the 'ToDo' tag and 'Save & Close' the document.
Setting up Paperless-ngx in Docker
My Way
You've come a long way (or maybe you jumped ahead to grab my Docker config). Now, let's chat about how I've configured my Paperless instance to run in Docker. To make this work, we'll need three containers: a database (usually PostgreSQL, which I prefer), a Redis broker for scheduled tasks, and, of course, Paperless-ngx itself.
Use of Alpine images
I'm a fan of Alpine images – they're speedy and light on resources. So, when I set up a service, I check if there are Alpine images up for grabs.
If I bump into a hiccup, I switch back to the regular image first. Gotta make sure it's not an Alpine image causing the trouble with dependencies.
Redis Container
Alright, let's kick things off with the easiest part: the Redis broker.
paperless-redis:
  container_name: paperless-redis
  image: redis:7.2-alpine #fixedVersion
  restart: unless-stopped
  networks:
    - backend
  security_opt:
    - no-new-privileges:true
  volumes:
    - ./paperless/redis:/data
  environment:
    REDIS_ARGS: "--save 60 10"
Here are some important points to highlight in my Docker Compose code for the Redis broker:
Naming Convention: I use a naming convention for supporting services, where it's structured as <Name of the supported service>-<Name of the supporting service>. In this case, it's 'paperless-redis,' and this convention applies to both the service and container name.
Fixed Image Version: I always specify a fixed image version for supporting services. This helps prevent issues when upgrading the Docker stack. It ensures that the version I'm using is compatible with my main service. This is particularly crucial for databases, where version mismatches can require migration steps.
Docker Networks: I organize my Docker containers into two networks:
- Frontend: This network is for services that run behind my reverse proxy and require outside access (outside means outside of the server running docker).
- Backend: This network is for services that solely support other services and don't need outside access.
Container Privileges: I specify that the container cannot have additional privileges, which enhances security.
Bind Mount (Volume Path): I follow a specific structure for the bind mount (volume path). It starts with a folder named after the main service and then includes a subfolder named after the supporting service. This organization makes it easy to remove a specific configuration if I decide to discard something I've experimented with.
Redis Configuration: Specific to Redis, I set an environment variable that instructs it to save its state to disk every 60 seconds or after 10 write operations. This ensures data durability.
If you're wondering why there's no port setting, it's because we're working within a Docker network. We can access the container ports without explicitly defining them here. The port definition creates a port mapping between the container and the host machine/VM.
Warning: Ports ignore firewall rules
It's worth noting that the default Docker network (bridge network) isn't affected by rules from an iptables-based firewall. I'll dive deeper into this in an upcoming article about securing your Docker setup.
PostgreSQL Container
When it comes to databases in my self-hosting setup, I'm a fan of PostgreSQL. It's my preferred choice. In the case of Paperless-ngx, it defaults to PostgreSQL, but you do have the option to run MariaDB if that's your preference. I personally also always deploy a DB per service and do not reuse the same DB twice.
Let's have a look at the docker compose of the database.
paperless-postgres:
  container_name: paperless-postgres
  image: postgres:16.0-alpine #fixedVersion
  restart: unless-stopped
  networks:
    - backend
  security_opt:
    - no-new-privileges:true
  volumes:
    - ./paperless/postgres:/var/lib/postgresql/data
  environment:
    POSTGRES_USER: DBUSERNAME
    POSTGRES_DB: DBNAME
    POSTGRES_PASSWORD_FILE: /run/secrets/paperless_db_paperless_passwd
    #POSTGRES_PASSWORD: $PasswordFromEnvFile
  secrets:
    - paperless_db_paperless_passwd
I prefer to use a docker secret for the password if the image supports it. I've also included a commented-out line for providing the password via a .env file if you prefer that method.
Since I'm using a secret, I need to map it appropriately. I'll be covering the use of secrets in a future article about securing your Docker environment. Stay tuned for that!
Paperless-ngx Container
Finally, let's get to the main reason you're here: the Docker Compose configuration for my Paperless-ngx container.
paperless:
  container_name: paperless
  image: ghcr.io/paperless-ngx/paperless-ngx:latest
  restart: unless-stopped
  networks:
    - frontend
    - backend
  ports:
    - 8000:8000
  security_opt:
    - no-new-privileges:true
  depends_on:
    - paperless-redis
    - paperless-postgres
  volumes:
    - ./paperless/paperless/data:/usr/src/paperless/data # Docker container data
    - ./paperless/paperless/media:/usr/src/paperless/media # Location of your documents
    - ./paperless/paperless/export:/usr/src/paperless/export # Target for backups
    - ./paperless/paperless/consume:/usr/src/paperless/consume # Watch folder
  environment:
    USERMAP_UID: $PUID
    USERMAP_GID: $PGID
    PAPERLESS_TIME_ZONE: $TZ
    PAPERLESS_OCR_LANGUAGE: deu+eng
    PAPERLESS_REDIS: redis://paperless-redis:6379
    PAPERLESS_DBHOST: paperless-postgres
    PAPERLESS_DBNAME: DBNAME
    PAPERLESS_DBUSER: DBUSERNAME
    PAPERLESS_DBPASS_FILE: /run/secrets/paperless_db_paperless_passwd
    #PAPERLESS_DBPASS: $PAPERLESS_DBPASS
    PAPERLESS_SECRET_KEY_FILE: /run/secrets/paperless_secret_key
    #PAPERLESS_SECRET_KEY: $PAPERLESS_SECRET_KEY
    PAPERLESS_FILENAME_FORMAT: "{{created_year}}/{{correspondent}}/{{created}} {{title}}"
    PAPERLESS_URL: "<YOUR PAPERLESS URL>"
    PAPERLESS_ALLOWED_HOSTS: PAPERLESS_URL
    # Set the following two for your first launch
    # and change the admin password afterwards.
    # Once setup, you can safely remove these variables.
    PAPERLESS_ADMIN_USER: "<ADMIN_USER>"
    PAPERLESS_ADMIN_PASSWORD: "<ADMIN_PASSWORD>"
Let's take a closer look at some of the specific details in the Docker Compose configuration:
Networks: We join both networks because we want Paperless to communicate with the reverse proxy (not setup or covered in this article) and other services on the backend network.
Ports: To access Paperless from other devices on your local network, we create a port mapping, which would not be needed when using a reverse proxy.
Depends On: This ensures that the specified containers are running before starting Paperless.
Volumes: We use volumes for data persistence, including our documents and Paperless configuration. I usually use NFS mounts for media, export, and consume which go straight to my NAS. For simplicity, bind mounts are used here.
Environment Variables
USERMAP_UID & USERMAP_GID: It's a good practice to set these to the IDs of your personal user on the Docker host system. This helps avoid permission issues when editing config files or accessing PDFs on the file system.
PAPERLESS_OCR_LANGUAGES: Set this to the languages you expect your documents to be in.
PAPERLESS_REDIS: Specify the path to your Redis container.
PAPERLESS_DB*: Configuration details to access your deployed database.
PAPERLESS_SECRET_KEY: It's essential to set this to enhance security. The default token is well-known, so changing it is recommended.
PAPERLESS_FILENAME_FORMAT: This determines the folder structure and filename of the PDFs stored in 'media'. You can customize it using various variables. I use a folder for the year created, followed by the correspondent, and then the filename as the creation date with the title from Paperless.
PAPERLESS_URL: Set it to your domain name or the URL, including the port you'll use to access Paperless.
PAPERLESS_ALLOWED_HOSTS: This setting restricts access to Paperless only from the addresses you specify.
PAPERLESS_ADMIN_USER & PAPERLESS_ADMIN_PASSWORD: Set these two before your first startup, and once you have logged in and changed the password, you can remove the variables. They are only needed to create the initial admin user. Otherwise, you can run the command 'createsuperuser,' but I prefer the above variables
These are the configuration settings I've opted for, but there are many more options to explore. I recommend checking out the well-written Paperless-ngx documentation to tailor the setup to your needs. It's a valuable resource for fine-tuning your self-hosted document management system.
Data Safety 101: The Power of Regular Backups
A helpful Redditor reminded me that I hadn't covered backups. Can you blame me? My backup system is so smooth that I rarely think about it (will be covered in the future). However, let's dive into the specifics of backing up Paperless.
Since we're running everything in Docker and have the export path mounted, we can easily use Paperless's built-in backup solution. To automate this, we'll add a specific command to a crontab job (under root user) on our Docker host machine. Personally, I like to create a shell script and launch it from the crontab. This approach allows me to make changes to the command without editing the crontab directly, but you can also insert the command directly into the crontab if you prefer.
The command I am adding to my 'paperless_backup.sh' shell script:
docker exec -it paperless document_exporter ../export -d -f -p -sm -zYou can find the documentation of the backup command here. But in short:
-d: will delete old backups
-f: uses my custom filname format
-p: uses dedicated folders for archive, originals, thumbnails and jsons
-sm: creates jsons per document instead of one large file
-z: zips the backup
Now, let's add this to the crontab. We need to include it in the root's crontab because our normal user doesn't have the access rights to run Docker commands without 'sudo,' and using 'sudo' won't work in a crontab due to the password prompt.
sudo crontab -eI'm scheduling it to run at 4 am because at 3am my hypervisor backes up and my off-site backup starts at 5 am. This way, it includes the backup of Paperless and moves it to my off-site location. The backup itself only takes a couple of minutes for me, so there's no risk of overlapping with the off-site backup process.
Instead of adding the 'sh ' to the crontab, you could also directly add the command from the shell script in here.
0 4 * * * sh /server/docker/scripts/paperless_backup.shWarning: Supposed to stop Paperless before backup
According to the documentation, we should stop Paperless before running the backup. However, since we're running it in Docker, we can't stop the container as we need it for the backup command.
One of the maintainers wrote, everything should run fine as an online backup. There are measures in place to prevent issues when a backup runs while files are being uploaded. Check the GitHub discussion
Keeping Your Digital Archive Up-to-Date
We now have everything up and running, have backups configured. Let's talk about updating your paperless instance.
Personally, I do not create an extra backup before I run an upgrade for the paperless container. It is different when I update Redis or PostgreSQL! Generally, I update my whole homelab a couple of times a week, and every now and then, I do go through the Docker stack and check the background services if they should be updated. All those containers run a fixed version.
Let me walk you through the different steps.
Updating Paperless-ngx
Updating Paperless is very simple. It's just a matter of pulling a new image and starting the Docker Compose, which will restart Paperless if there is a new image available.
sudo docker compose pull
sudo docker compose up -d
If you have more services in the Docker Compose with the latest tag or just want to make sure to only update one container, add the container's name like this.
sudo docker compose pull paperless
sudo docker compose up -d paperless
Updating Redis
I don't take any special precautions when updating Redis. It's just an in-memory message broker, so if anything goes wrong, I can just delete all the persistent data from './paperless/redis', use the image that worked, and spin it back up.
If you want to be extra safe, you can stop the container and make a backup of the './paperless/redis' folder before updating.
Now, all you need to do is set the image version to your choice, pull it, and start the container.
After making changes, it's important to check Paperless. Ensure everything's running smoothly, like verifying if your email import is working as expected. It's a good practice to ensure everything's in order.
Updating PostgreSQL
Now, let's dive into the trickier bit – updating the database. I don't do this casually and also do not do it often.
Minor Version upgrades
We distinguish between minor and major version upgrades. If the major version matches (the first number):
- Halt all three Paperless containers.
sudo docker stop paperless paperless-redis paperless-postgres- Create a copy of the './paperless' directory.
mkdir backup
sudo cp -r ./paperless ./backup/paperless- Update the image version.
- Fetch the latest image.
sudo docker compose pull- Start the containers.
sudo docker compose up -dMajor Version Upgrades
Major version upgrades for databases can be quite stressful. Some services specify compatible versions, but I couldn't find this info in Paperless-ngx docs. So, it's a bit of a gamble.
Ensure you have a safe backup ready, just in case we need it later. Safety first!
docker exec -it paperless document_exporter ../export -d -f -p -sm -zWith everything safely backed up, we're ready to start the update process (source of the process).
- Stop paperless and redis containers
sudo docker stop paperless paperless-redis- Create a backup of the database and stop the container afterwards
sudo docker exec -it paperless-postgres pg_dumpall -U paperless > ./upgrade_backup.sql
sudo docker stop paperless-postgres- It's a good idea to check the 'upgrade_backup.sql' file to ensure the backup was successful. If you see only a few lines or encounter permission issues, pause and resolve them until you have a working dump. Don't rush this step.
- Create a copy of the './paperless/postgres' folder
- Delete the './paperless/postgres' folder
- Set the new version you would like to use
- Start the database again
sudo docker compose up -d paperless-postgres- Copy the 'upgrade_backup.sql' file from the copied folder to './paperless/postgres'
- Now run the command to import backup into the new container
sudo docker exec -it Paperless-NGX-DB psql -U paperless < ./upgrade_backup.sql- Start all paperless containers and check everything works fine
sudo docker compose up -dThere you have it, all updated and good to go!
Paperless-ngx in Docker: The Full Stack
version: "3.9"

networks:
  frontend:
    name: frontend
    driver: bridge
  backend:
    name: backend
    driver: bridge
  default:
    name: default
    driver: bridge

secrets:
  paperless_db_paperless_passwd:
    file: ./secrets/paperless_db_paperless_passwd
  paperless_secret_key:
    file: ./secrets/paperless_secret_key

services:
  paperless:
    container_name: paperless
    image: ghcr.io/paperless-ngx/paperless-ngx:latest
    restart: unless-stopped
    networks:
      - frontend
      - backend
    ports:
      - 8000:8000
    security_opt:
      - no-new-privileges:true
    depends_on:
      - paperless-redis
      - paperless-postgres
    volumes:
      - ./paperless/paperless/data:/usr/src/paperless/data # Docker container data
      - ./paperless/paperless/media:/usr/src/paperless/media # Location of your documents
      - ./paperless/paperless/export:/usr/src/paperless/export # Target for backups
      - ./paperless/paperless/consume:/usr/src/paperless/consume # Watch folder
    environment:
      USERMAP_UID: $PUID
      USERMAP_GID: $PGID
      PAPERLESS_TIME_ZONE: $TZ
      PAPERLESS_OCR_LANGUAGE: deu+eng
      PAPERLESS_ENABLE_UPDATE_CHECK: "true"
      PAPERLESS_REDIS: redis://paperless-redis:6379
      PAPERLESS_DBHOST: paperless-postgres
      PAPERLESS_DBNAME: DBNAME
      PAPERLESS_DBUSER: DBUSERNAME
      PAPERLESS_DBPASS_FILE: /run/secrets/paperless_db_paperless_passwd
      #PAPERLESS_DBPASS: $PAPERLESS_DBPASS
      PAPERLESS_SECRET_KEY_FILE: /run/secrets/paperless_secret_key
      #PAPERLESS_SECRET_KEY: $PAPERLESS_SECRET_KEY
      PAPERLESS_FILENAME_FORMAT: "{{created_year}}/{{correspondent}}/{{created}} {{title}}"
      PAPERLESS_URL: "<YOUR PAPERLESS URL>"
      PAPERLESS_ALLOWED_HOSTS: PAPERLESS_URL
	  # Set the following two for your first launch
	  # and change the admin password afterwards.
	  # Once setup, you can safely remove these variables.
	  PAPERLESS_ADMIN_USER: "<ADMIN_USER>"
      PAPERLESS_ADMIN_PASSWORD: "<ADMIN_PASSWORD>"
    secrets:
      - paperless_db_paperless_passwd
      - paperless_secret_key

  paperless-postgres:
    container_name: paperless-postgres
    image: postgres:16.0-alpine #fixedVersion
    restart: unless-stopped
    networks:
      - backend
    security_opt:
      - no-new-privileges:true
    volumes:
      - ./paperless/postgres:/var/lib/postgresql/data
    environment:
      POSTGRES_USER: DBUSERNAME
      POSTGRES_DB: DBNAME
      POSTGRES_PASSWORD_FILE: /run/secrets/paperless_db_paperless_passwd
      #POSTGRES_PASSWORD: $PasswordFromEnvFile
    secrets:
      - paperless_db_paperless_passwd

  paperless-redis:
    container_name: paperless-redis
    image: redis:7.2-alpine #fixedVersion
    restart: unless-stopped
    networks:
      - backend
    security_opt:
      - no-new-privileges:true
    volumes:
      - ./paperless/redis:/data
    environment:
      REDIS_ARGS: "--save 60 10"
Full Docker Compose Stack for Paperless-ngx
Farewell, Paper Clutter
Closing Notes
Whew, that was quite a journey! We delved into Paperless-ngx, discovered the wonders of digital tagging over paper folders, and I spilled the beans on my battle-tested setup that's served me well for years. Our docker-compose adventure unfolded, providing you with the full recipe to kickstart your own paperless journey (if you have a running docker environment).
As for alternatives, I've been so content with Paperless that I've lost track of what's out there today. I can only vouch for the solution I know and love, but who knows what other gems might be waiting in the wings?
Farewell for now, fellow self-hosters. Keep the servers humming and the data flowing! Until next time, happy self-hosting.
Henning