Backup Strategy with Restic and Healthchecks.io
This article covers a backup strategy using Restic and Healthcheck.io to achieve a completely hands-off approach. It also covers running Restic on TrueNAS Scale and connecting Proxmox to Healthchecks.io.


Introduction
Welcome back! In my previous articles, we set up a Debian server and took a deep dive into Docker. By now, you probably have your first services up and running. Before we explore more advanced possibilities, we need to talk about backups.
My home lab is a mix of production services that I rely on daily and a playground where I test new things. You might say I should have a separate environment, and you wouldn’t be wrong. But for me, testing new stuff means weaving it into my daily routines, so I prefer the luxury of my prod environment.
To recover from any mistakes or issues, I have a solid backup routine in place. What's even better is that it's completely hands-off and will notify me of any problems. To achieve my hands-off backup approach, I rely on a trio of powerful tools: Proxmox Backup Server, Restic, and Healthchecks.io. Proxmox Backup Server handles the backups of my virtual machines and containers, providing a robust and efficient solution. Restic takes care of file-level backups with its simplicity and reliability. Meanwhile, Healthchecks.io keeps a watchful eye on everything, ensuring I'm notified if anything goes wrong. This combination ensures my backup routine runs smoothly without requiring constant attention.
3-2-1 the Backup Gold Standard
Now, let’s discuss the gold standard of backups: the 3-2-1 rule.
3 stands for three different copies, meaning your data should exist in three copies. This ensures that even if one copy fails, you still have two copies to fall back on.
2 stands for two different storage devices. This means your data should be on at least two different physical devices. Some argue these should even be different device types, but I think two different disks, for example, are good enough!
1 stands for one off-site backup. You absolutely should have one copy/backup stored at a different location in case of flood, fire, or any other disaster that could compromise your main site.
In other words, you need:
- The original data (Copy 1).
- One backup copy (Copy 2).
- Another backup copy (Copy 3).
So, you have the data stored in three locations in total:
- Original Data: For example, on your primary computer or server.
- First Backup: On an external hard drive, another server, or a different type of storage media in your server.
- Second Backup: In the cloud or on an offsite server, providing additional protection against local disasters.
Overview of My Approach
I have a setup at home that includes my main Docker server running on a Debian VM within Proxmox, a NAS (TrueNAS Scale), and a Raspberry Pi. Additionally, I have a 13-year-old laptop running Proxmox Backup Server (PBS) located at my parents' house, which is connected to my network via VPN.
Here's how my backup strategy works: every night, my data on the NAS is backed up onto an additional HDD mounted in my Debian VM using Restic. This also applies to other data on various VMs, the Raspberry Pi, and my Docker directory on the Debian VM, which gets backed up additionally at noon. This serves as the first line of defence.
Moreover, another nightly backup runs using Restic to create a backup on my offsite laptop, with Docker data backed up again around noon. This ensures an offsite copy of my data, adhering to the 3-2-1 backup rule.
My Proxmox VM backup is only backed up once a night onto my offsite laptop. While this doesn’t comply fully with the 3-2-1 rule, I’m okay with it because, in 99% of cases, I would rebuild the VM, and the data is already covered by Restic.
As a side note, I don't follow the best practice of stopping Docker containers or databases before they are backed up. My backups are incremental, and I keep numerous versions. It would be extremely unlucky for all these versions to be corrupted. Also, very important services run their inbuilt backup jobs creating files / zips, which are then picked up in the Restic jobs automatically.
Restic - Backups done right!
Let’s now dive into setting up Restic, getting your first backup job running, and integrating it with Healthchecks.io. Once we’re done, you’ll have a seamless, automated backup system that you can set and forget!
Personally, I rely on SFTP for transferring my backups due to its robust security features. However, if you're exploring other options, you can refer to the link here for alternatives. Depending on your setup, you may need to make adjustments if you're not using SFTP like I do. It's always good to explore different methods to find what best suits your needs for backup management.
In this article "Target" refers to the location where we want to push our backup. For the purposes of this article, I assume you have another server (whether on-site or off-site does not matter) to which you are transferring the backup via SFTP. "Source" refers to the server that holds the data we want to back up.
SSH Config for root (for SFTP Backups)
Before we can initialize the target using SFTP, we need to ensure we have SSH access to the target. If you followed my Debian article, we only allow key-based authentication. Additionally, I always run all my backups as root to avoid any file access issues. With running the backup I mean executing the script on our source system. This also means we need to ensure our root user has SSH access to the target.
If root does not yet have an SSH key, you'll need to generate one and then copy the public key to the target device where you want to set up Restic with SFTP.
sudo ssh-keygen -t ed25519 -a 100Now that we have our SSH key ready to go and assuming your target location is securely configured (so no ssh-copy-id shortcut here!), let's manually grab that public key and add it to the authorized_keys file.
sudo cat /root/.ssh/id_ed25519.pubCopy the value of the SSH public key. Next, use ssh to connect to the target machine. Once in, proceed to edit your authorized_keys file and paste the public key into it. This will allow you to authenticate securely using SSH keys and yes we are editing our users authorized_keys file and not the root one, as we do not need root access on the target device.
Now, test your SSH connection as you normally would, but this time prefix it with sudo to make sure it works from the root user as well. This ensures you can perform administrative tasks securely and manage your system effectively through SSH.
Setting up Restic
First, we need to install Restic on all devices we want to back up from. The target location does not need Restic installed!
sudo apt update
sudo apt install restic
As part of our Restic setup, we'll create a restic_password file in our home directory. This file will securely store the password used for encrypting and decrypting our Restic backups. It's a crucial step to ensure that our backup process remains secure and our data stays protected. We also use a file-based password to avoid embedding the password directly into the bash script. This adds an extra layer of security, ensuring the backup password remains protected while keeping our script clean and secure.
touch ~/restic_passwordTo ensure that only the root user and ourselves can access the restic_password file, we need to adjust its permissions accordingly. We'll set it up so that it's readable and writable only by these users.
chmod 640 ~/restic_passwordNow, you can edit the restic_password file and enter your chosen password. For better security, consider randomly generating a password or simply mashing keys on your keyboard. Remember, this file should only contain your password and nothing else and also remember to take a note of the used password!
Initialising Restic Repository
Alright, with Restic installed and our password securely stored, the next step is to initialize our target location. This involves creating a repository which will serve as our backup store. This repository will hold all our encrypted backup data, ensuring it's safe and accessible for future restores.
sudo restic -p /home/<USERNAME>/restic_password -r sftp://<USERNAME>@<IP/HOSTNAME>:<PORT>//<PATH_TO_STORE_BACKUP>/<BACKUP_NAME> initLet's break down the restic command for initializing a repository step by step:
-p /home/<USERNAME>/restic_password: This flag specifies the path to the file containing the Restic password.-r sftp://<USERNAME>@<IP/HOSTNAME>:<PORT>//<PATH_TO_STORE_BACKUP>/<BACKUP_NAME>:-r: This flag indicates the repository location.sftp://: Specifies the use of the SFTP protocol.<USERNAME>: Your username on the remote server.<IP/HOSTNAME>: The IP address or hostname of the remote server.<PORT>: The port number (typically 22 for SFTP, but we always change this!).//<PATH_TO_STORE_BACKUP>/<BACKUP_NAME>: The target location on the server where backups will be stored. Adjust<BACKUP_NAME>to your preferred name for the backup repository.
inittells restic to initialise the repository.
Congratulations! You've successfully initialized your first backup. Personally, I prefer using separate repositories for different backups, but you can also use a single repository if you prefer. This approach is particularly useful when you have duplicate files, as Restic automatically deduplicates files within the backup, saving storage space and simplifying management.
Running the First Backup
Now, let's kick off the initial backup manually before we proceed to script it and schedule it using cron.
sudo restic -p /home/<USERNAME>/restic_password -r sftp://<USERNAME>@<IP/HOSTNAME>:<PORT>//home/<USERNAME>/<BACKUP_NAME> backup /<LOCATION_TO_BACKUP>We already know most of the command. Simply replace init with backup and include the path to the location you want to back up. This will initiate the backup process for that specific directory or file.
Creating the Backup Script
Next, we'll create a backup script that we can call from cron. Using a script allows us to organize multiple commands efficiently and easily adapt it for backups from other locations or servers by making slight adjustments.
We start by running restic unlock to ensure that the repository isn't locked due to a previous interrupted operation or another process accessing it. This command releases any locks and prepares the repository for the next operation, which is crucial for maintaining the integrity of our backups.
Next, we perform the restic backup command to initiate the backup process itself. This command takes the specified data and securely transfers it to the repository we've configured, ensuring our data is safely stored and encrypted.
After completing the backup, we execute the restic forget command. This command manages the retention policy of our backups by removing older snapshots according to specified criteria, such as keeping a certain number of recent backups (--keep-last) or retaining backups within a specific time frame (--keep-hourly, --keep-daily, etc.). This helps optimize storage usage while ensuring we retain relevant backup snapshots for future recovery needs.
#!/bin/bash

# Define variables
RESTIC_PASSWD="/home/<USERNAME>/restic_password"
BACKUP_SOURCE="/<LOCATION_TO_BACKUP>"
BACKUP_REPO="<PATH_TO_STORE_BACKUP>/<BACKUP_NAME>"
KEEP_OPTIONS="--keep-hourly 2 --keep-daily 6 --keep-weekly 3 --keep-monthly 1"

# Perform Restic unlock and capture output
restic -p $RESTIC_PASSWD -r $BACKUP_REPO unlock

# Perform Restic backup
restic -p $RESTIC_PASSWD -r $BACKUP_REPO backup $BACKUP_SOURCE

# Perform Restic forget
restic -p $RESTIC_PASSWD -r $BACKUP_REPO forget $KEEP_OPTIONS --prune --cleanup-cache
Let's examine the script above and discuss a few points. I'm using variables to make it easier to modify the script without having to edit lengthy commands each time.
- Variables:
RESTIC_PASSWD: Path to the file containing the Restic password.BACKUP_SOURCE: Location on your system to be backed up.BACKUP_REPO: Path where the backup will be stored, including the name of the backup repository. This includes the SFTP connection details in my case.KEEP_OPTIONS: Specifies the retention policy for the backups, including how many hourly, daily, weekly, and monthly backups to retain. I am keeping 2 hourly backups, the backups of the last 6 days, then 3 weekly versions and one monthly one.
- Restic forget command:
restic -p $RESTIC_PASSWD -r $BACKUP_REPO forget $KEEP_OPTIONS --prune --cleanup-cache- Initiates the forget operation in Restic, which manages the retention policy of backup snapshots.
--prune: Removes unreferenced data from the repository to free up storage space.--cleanup-cache: Cleans up any temporary cache files used during the backup and forget operations.
Let's save this script somewhere. Assuming you are saving it in your home directory, we'll name it restic_data.sh.
Scheduling the Backup
Now, we can add this script to cron. We'll do this using the root user to ensure that all files can be accessed during the backup process.
sudo crontab -eLet's assume we want to schedule the backup to run at midnight and noon every day. Here's the line you would add to the end of your root's crontab:
0 0,12 * * * sh /home/<USERNAME>/restic_data.shNow that you have a scheduled backup running, the next step is ensuring you have monitoring in place to track job statuses and failures. Before setting up and integrating Healthchecks.io into our script, let's quickly review how to perform a restore from a Restic backup.
Restoring using Restic
Restoring using Restic is straightforward. Simply create a folder on your device where you want to restore file(s) to, mount the Restic repository, and then browse the backup just like any other mounted directory on your system. This makes accessing and recovering files from backups simple and efficient.
I usually have a folder called RESTORE in my home directory where I mount my repositories.
mkdir ~/RESTORELet's mount the repository we created and backed up to earlier. Keep in mind that this terminal session will be occupied serving the mount, so you'll need another terminal session to browse the files. If you're looking to restore larger amounts, consider exploring the restore option provided by Restic for more efficient recovery.
restic -p /home/<USERNAME>/restic_password -r sftp://<USERNAME>@<IP/HOSTNAME>:<PORT>//home/<USERNAME>/<BACKUP_NAME> mount ~/RESTORENow that you've mounted the backup repository, you can use another terminal session to browse the files and start copying anything you need. Remember, Restic mounts are intentionally read-only to ensure the integrity of your backups. This setup allows you to access your backups securely and retrieve specific files as required.
Comply with the Rules - Another Backup Location
As we discussed initially, implementing two backup jobs per source (one of which should be off-site) ensures compliance with the best practice of the 3-2-1 backup strategy. This step is straightforward since you've already done it once. Simply select another location for the backup, go through the initialization process, connect to it via SFTP if it's a remote location (not on the same device), copy the backup script, and slightly adjust it to reflect the new destination.
I recommend scheduling this backup to run at a different time to minimize potential issues with the source system. This staggered scheduling helps avoid conflicts and ensures continuous, reliable backups.
Regular Manual Spotchecks are Mandatory
Next, we will set up monitoring, but remember to periodically perform a manual test restore. When I started using Restic, I did this every few months; now, I do it about once a year. Some even wipe out their backups annually and run a complete fresh backup.
The main point is this: your backup is your last resort when something goes wrong. Don’t put yourself in a situation where you've never tested a restore and then find out it doesn’t work when you need it most!
Healthchecks.io - Monitoring our Backup Jobs
Alright, we've done the heavy lifting to ensure we have a backup running. While it's tempting to consider the job done, it's crucial to always know whether your backups are successful. The worst-case scenario (something many individuals and companies have experienced) is needing to restore data only to discover that the backup process stopped working months ago without anyone noticing.
In this next part, we are going to set up the Healthchecks.io Docker container, configure monitoring for our backup job, and adjust our backup script to report back to Healthchecks. As a bonus, we will also log the backup time and send the logs to Healthchecks, which will help us analyse any issues should they occur.
Healthchecks.io Docker Setup
Setting up the Healthchecks.io Docker container is quite straightforward. I will not go into too many details about the different variables being used. After my Docker 101 article, I trust that you should be able to understand the following compose file. I would also highly encourage you to check out their list of variables and add whatever you need.
networks:
  frontend:
    name: frontend
    driver: bridge

services:
  healthchecks:
    container_name: healthchecks
    image: lscr.io/linuxserver/healthchecks:latest
    restart: unless-stopped
    networks:
      - frontend
    ports:
      - 8000:8000
    security_opt:
      - no-new-privileges:true
    environment:
      PUID: $PUID
      PGID: $PGID
      TZ: $TZ
      ALLOWED_HOSTS: <IP_OF_YOUR_HOST>
      SITE_ROOT: http://<IP_OF_YOUR_HOST>:8000
      SITE_NAME: Healthchecks
      SUPERUSER_EMAIL: $EMAIL
      SUPERUSER_PASSWORD: $SUPERUSER_PASSWORD
      DEBUG: 'False'
      DEFAULT_FROM_EMAIL: $EMAIL
      EMAIL_HOST: $SMTP_HOST
      EMAIL_PORT: 587
      EMAIL_USE_TLS: 'True'
      EMAIL_HOST_USER: $EMAIL
      EMAIL_HOST_PASSWORD: $EMAIL_HOST_PASSWORD
      SECRET_KEY: $SECRET_KEY
    volumes:
      - $DOCKERDIR/healthchecks/config:/config
If you have followed my Debian article, you have implemented the UFW firewall. Remember to open port 8000 (or your chosen port) in the firewall as well!
Setup a Check in Healthchecks.io
Now that Healthchecks.io is running, we can set up our first monitoring check, which we will then integrate into our bash script.
Once logged in, you'll see there's already a check named "My First Check" that we're going to edit now. To do so, click on the three dots on the right side.
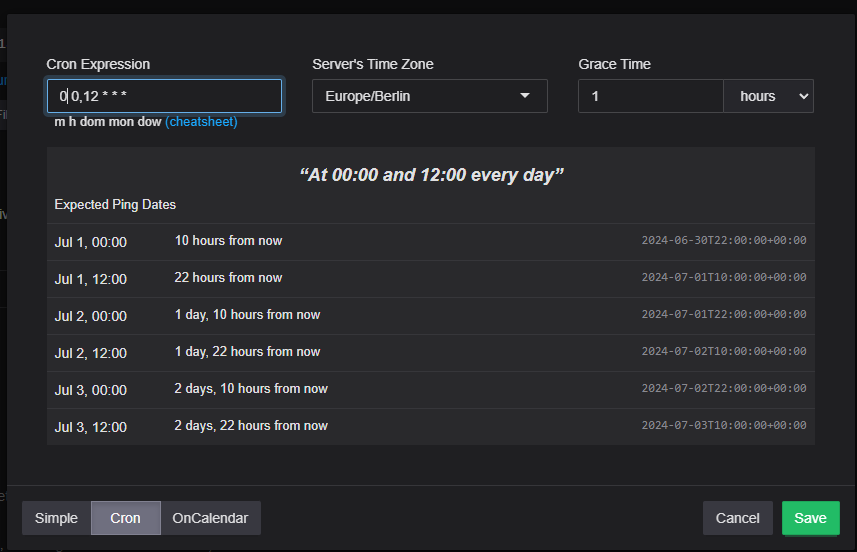
The first thing I did was change the name and add a short description. Next, I adjusted the schedule. Healthchecks.io needs to know when this backup is scheduled to run. I typically set a grace period of one hour, meaning the backup job must report to Healthchecks.io within an hour of its planned start time. If it doesn't, an email notification is sent to us. If the backup reports in after the grace period, indicating that everything is fine again, we'll receive another email notification.
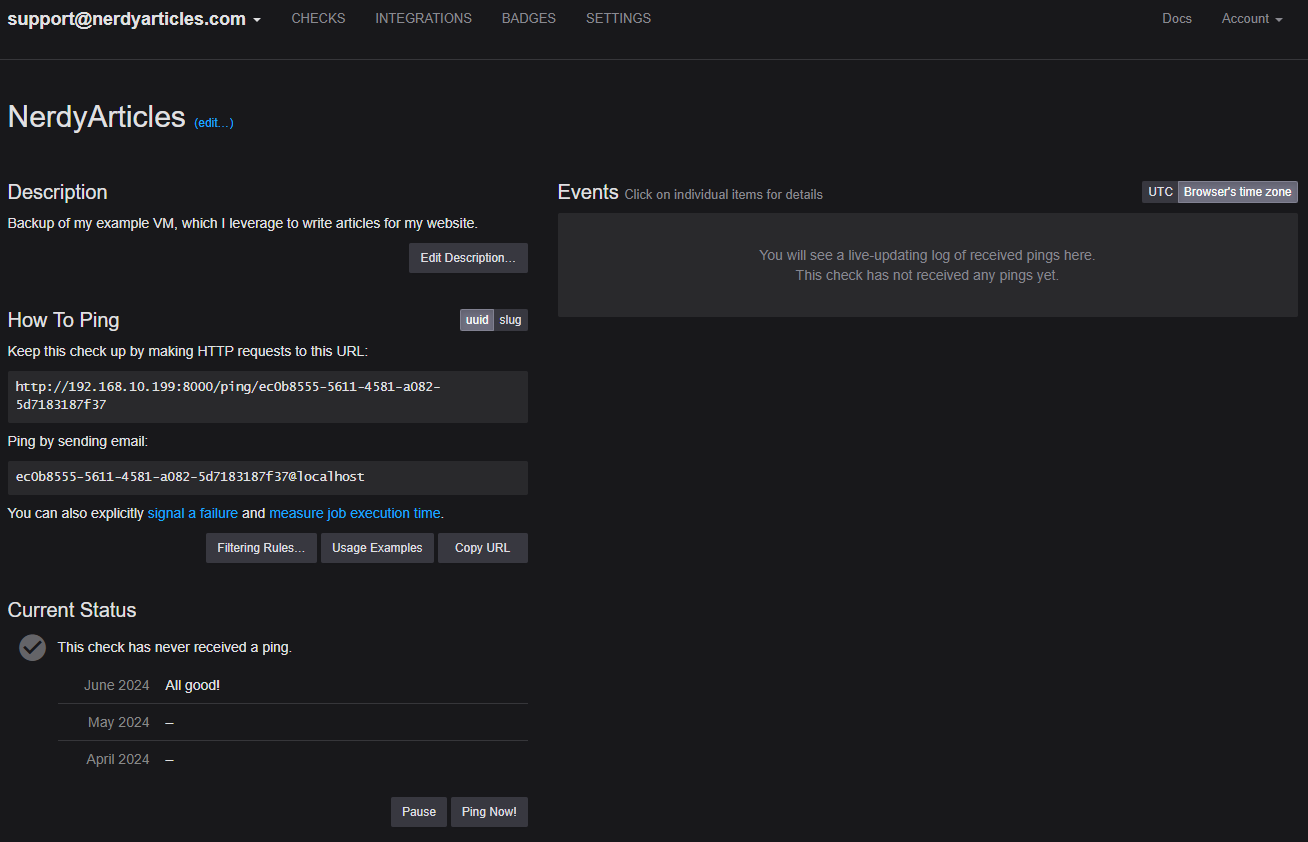
Before we proceed to our script, let's quickly verify that the email notification is working. Click on "Integrations" at the top, then click on "Test!" for our already configured mail integration.
Lastly, you'll need to return to your check and obtain the "Ping URL". I personally prefer using the UUID ping URL and do not use slugs altogether. Using slugs allows you to create checks from outside, which I do not leverage.
Backup Script with Healthchecks.io Integration
Full disclosure, I'm not an expert in creating advanced bash scripts and relied on ChatGPT to assist me (which worked extremely well). I understand the process, but I wouldn't be able to create this without assistance. There are likely more elegant or sophisticated methods available, but this solution works well for me and I'm satisfied with it.
Here is the end result of my script:
#!/bin/bash

# Define variables
RESTIC_PASSWD="/home/<USERNAME>/restic_password"
BACKUP_SOURCE="/<LOCATION_TO_BACKUP>"
BACKUP_REPO="<PATH_TO_STORE_BACKUP>/<BACKUP_NAME>"
WEBHOOK_URL="http://192.168.10.199:8000/ping/ec0b8555-5611-4581-a082-5d7183187f37"
KEEP_OPTIONS="--keep-hourly 2 --keep-daily 6 --keep-weekly 3 --keep-monthly 1"

# Create a temporary file
TMP_FILE=$(mktemp)

# Initialize variables
FAILURE=0

# Sending start ping to measure runtime
curl --retry 3 --retry-max-time 120 $WEBHOOK_URL/start

# Function to run a command and capture its output to a temp file
run_command() {
  local CMD="$1"                      # Takes the first argument as the command to be executed
  echo "Running: $CMD" >> "$TMP_FILE" # Logs the command being executed to $TMP_FILE
  $CMD >> "$TMP_FILE" 2>&1            # Executes the command and redirects both stdout and stderr to $TMP_FILE
  if [ $? -ne 0 ]; then               # Checks the exit status of the command
    # Sets FAILURE variable to 1 if the command failed
    # Passes TMP_FILE content into OUTPUT variable
    # Sends ping to Heathchecks with the failure code
    # Deletes the TMP_FILE
    # Exits the bash script
    FAILURE=1
    OUTPUT=$(cat "$TMP_FILE")
    curl -fsS -m 10 --retry 3 --retry-max-time 120 --data-raw "$OUTPUT" $WEBHOOK_URL/$FAILURE
    rm "$TMP_FILE"
    exit 1
  fi
  echo -e "\n" >> "$TMP_FILE"         # Adds a newline to separate commands in $TMP_FILE
}

# Perform Restic unlock and capture output
run_command "restic -p $RESTIC_PASSWD -r $BACKUP_REPO unlock"

# Perform Restic backup
run_command "restic -p $RESTIC_PASSWD -r $BACKUP_REPO backup $BACKUP_SOURCE"

# Perform Restic forget
run_command "restic -p $RESTIC_PASSWD -r $BACKUP_REPO forget $KEEP_OPTIONS --prune --cleanup-cache"

OUTPUT=$(cat "$TMP_FILE")

# Determine status based on the FAILURE flag and send webhook
curl -fsS -m 10 --retry 3 --retry-max-time 120 --data-raw "$OUTPUT" $WEBHOOK_URL/$FAILURE

# Clean up temporary file
rm "$TMP_FILE"
Let's break down the bash script and go through each part. In the beginning, we have our familiar variables set up, with the addition of WEBHOOK_URL to hold our Ping URL. The script uses mktemp to create a temporary file and stores the path and filename in TMP_FILE. Another variable, FAILURE, is initialized to 0, which conventionally indicates a success code in bash scripting. This sets the stage for the subsequent operations in our backup monitoring script.
Next, we establish the initial connection to our Healthchecks container. To start the clock of the runtime of our backups, we append our Ping URL with /start. This allows us to send our start ping using the curl command, configured to retry up to 3 times over a max of 120 seconds if it fails to send the "ping".
Now, we're tackling the most complex part. We've created a function to execute our various commands. This function takes a command as an argument, logs its execution to our temporary file, and monitors its exit status. If the exit status indicates failure (not 0 for success), we update the FAILURE variable with the exit code, capture the contents of TMP_FILE in the OUTPUT variable, and send a Healthchecks.io ping containing both the OUTPUT and exit code. We tidy up behind ourselves and delete the TMP_FILE. Subsequently, the bash script execution is terminated as soon as one of the commands fails. This triggers an email notification from Healthchecks.io, which includes the logs of the run, aiding in troubleshooting and analysis.
In the final section, you'll notice our familiar three Restic commands now preceded by run_command, which invokes our custom function. This triggers the function to execute each command and monitor their exit statuses. As discussed earlier, the function captures the output of these commands in TMP_FILE. Afterwards, we assign the content of TMP_FILE to the OUTPUT variable. Following this, we send a Healthchecks ping containing the log content and the exit code (since FAILURE variable was initialized to 0 and no command failed, we send success code 0). Finally, the script cleans up by removing the temporary file.
When you open the Healthchecks check, you'll find the events listed on the right-hand side. Initially, you should see the runtime logged. If you click on the last event, hopefully marked as "OK," you'll also find the logs from our latest run displayed. This provides a detailed record of the script's execution and its outcome within the monitoring interface.
Conclusion
Congratulations, you now have a fully monitored backup setup using Restic and Healthchecks.io. The worst-case scenario now would be if your machine running Healthchecks.io goes down, resulting in you not receiving failure notifications. However, in my case, this would include essential services on my main server going offline, which I would definitely notice. To mitigate the risk of only the Healthchecks container going down, it's advisable to monitor the container itself using tools like Uptime Kuma, although this isn't covered in this article. It is also worth to mention, that you can use their hosted service and monitor 20 jobs for free!
TrueNAS Scale Backups with Restic
As a NAS user running a self-built small server with TrueNAS Scale bare metal, Restic isn't currently supported for backups. However, this limitation shouldn't deter us from utilizing Restic to back up data from our NAS.
In this section, we're focusing solely on the steps to set up a Restic-based backup script on TrueNAS Scale. The script itself remains largely unchanged. I'll also assume that you're familiar with navigating TrueNAS Scale.
Setting up Restic on TrueNAS Scale
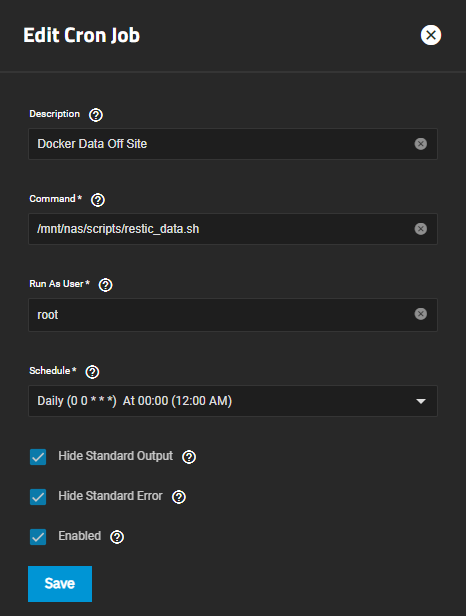
To run backups using Restic on TrueNAS Scale, we need to download the Restic binary and make slight modifications to our existing backup script. To simplify this process, I created a new network share and stored both the Restic binary and backup script there.
Go to the releases page of Restic on GitHub and download the version ending with "*_linux_amd64.bz2". Once downloaded, unpack this file and place it on the network share or any preferred file location on your NAS. This will provide the Restic binary needed for the backup operations. Personally, I also rename the Restic binary file to just "restic" on my NAS. This helps because the binary has an update functionality, and I prefer not to have the version number in the filename.
Copy your backup script to the NAS (for me that would be onto the newly created network share). Adjust the three Restic commands in the script as follows and update the variables at the top accordingly (don't forget to setup a new check on Healthchecks and to update the WEBHOOK_URL). Ensure that each Restic command is prefixed with the full path to the Restic binary. For example, on my NAS, it would look like this (where restic is the actual binary we downloaded):
run_command "/mnt/nas/scripts/restic -p $RESTIC_PASSWD -r $BACKUP_REPO unlock"I mentioned the update functionality of the Restic binary. You can navigate to the location of the binary in the terminal on your NAS (or specify the filepath) and execute the following command:
sudo restic self-updateThis command updates the Restic binary to the latest version available, ensuring you have the most up-to-date features and security patches.
Scheduling the Backup
Now that we have Restic setup on TrueNAS Scale along with the adjusted backup script, the final step remaining is to schedule our backup.
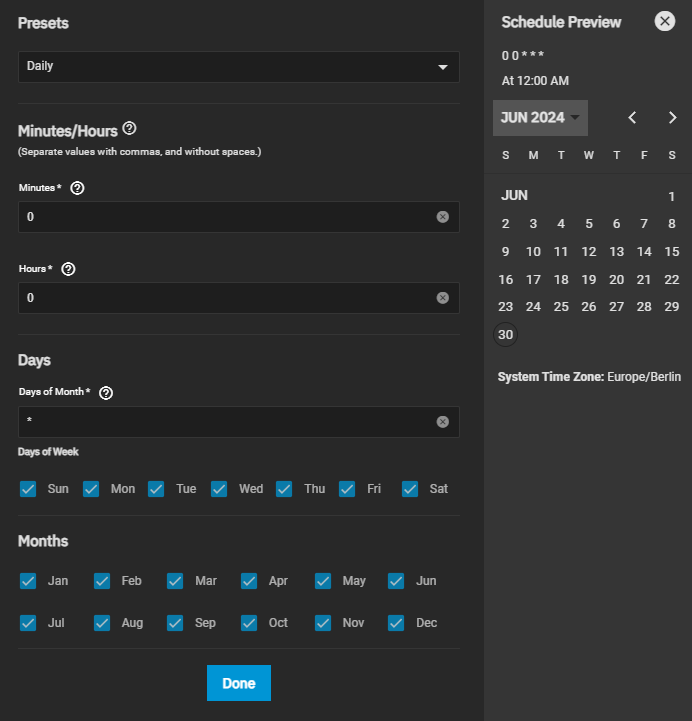
Log into the TrueNAS Scale web interface, navigate to "System Settings" > "Advanced," and then click on "Add" in the "Cron Jobs" section. This is where we'll schedule our backup script to run automatically at specified intervals.
These are the settings I have set for my schedule:
Conclusion
As you can see, setting up a Restic backup on TrueNAS Scale follows a similar process to setting it up on a "normal" Linux machine. The main difference is that instead of installing Restic, we use the binary, and the cron job is configured through the web interface rather than the command line.
Proxmox Backups with Healthchecks.io
For this section, I'm assuming you have a Proxmox machine running and a Proxmox Backup Server already set up. Configuring backups is straightforward; you set the schedule and choose which VMs or LXC containers to back up from the Datacenter level, with retention policies managed on the Proxmox Backup Server.
The more complex part arises if we want to integrate with Healthchecks.io. This requires creating a bash script to handle calls to our Healthchecks container and implementing it as a hook script. Currently, I haven't found a way to send logs directly to Healthchecks from Proxmox Backup jobs, but for me, my primary backup focus remains on my Restic jobs; VM backups serve as an additional failsafe, so I can live with this.
Hook Script
Alright, let's proceed to create a hook script on your Proxmox machine, not the Proxmox Backup Server. I'll assume you'll also stored it in your home directory and named it "proxmox_backup_hook.sh". Let's continue from here.
Here is my hook script:
#!/bin/bash

# Base URL for the webhook
WEBHOOK_URL="http://192.168.10.199/ping/c515d5cd-c7f0-4f2f-8593-d00d162705d7"

case "$1" in
    job-start)
        # Send a ping to the webhook when the backup starts
        curl -fsS --retry 3 --retry-max-time 120 "${WEBHOOK_URL}/start"
        ;;
    job-end)
        # Determine the exit status
        STATUS=$2

        # Send a ping to the webhook when the backup finishes, appending the status code
        curl -fsS --retry 3 --retry-max-time 120 "${WEBHOOK_URL}/${STATUS}"

        ;;
    *)
        # Other cases can be handled here if needed
        ;;
esac

exit 0
Let's take a quick look at what's happening in the script. We have the WEBHOOK_URL variable set again (remember to set up a new check on Healthchecks). The script then monitors the status of the backup job, specifically looking for "job-start" and "job-end" statuses.
When the script detects a "job-start" status, it sends a start ping to Healthchecks to start the clock of the runtime of the backup. Once the backup completes and the "job-end" status occurs, another ping is sent to Healthchecks.io. If the backup was successful, the STATUS variable will be 0, indicating success. Any other value will indicate a failed job, triggering a notification.
Implementing the Hook Script
The final step is to implement the hook script. Since there's no option to add a hook script directly in the Proxmox UI at the moment, we'll need to SSH into our Proxmox machine and edit the backup job configuration there. This allows us to integrate our custom hook script into the backup process.
Edit this file:
sudo nano /etc/pve/jobs.cfgIf you have multiple backup jobs configured and want to monitor each one with a hook script on Proxmox, you'll have to create specific scripts for each job. This ensures that pings are sent to their designated checks on Healthchecks.io. To implement the hook script, add the following line to the configuration of each job you want to monitor using a hook script:
script /home/<USERNAME>/proxmox-backup-hook.shhookscript line. This setup will throw an error indicating that only the root user can execute it. To manually start the backup job from the Proxmox UI, you'll need to log in using the root user account. This ensures you have the necessary permissions to manage and execute backup jobs as needed.Final Conclusion
Now you're all set! Ensure you've configured backups for everything critical to you and always maintain two copies (one local and one off-site). Personally, I backup all my Docker volumes without stopping them, which has the potential of file corruption. I schedule these backups at different times and retain multiple iterations to revert to a working version if needed. For highly critical data like Paperless, I use their built-in backup procedures as an extra layer of security.
Ideally, we never need these backups, but having multiple fail-safes keeps my mind at ease. As mentioned earlier, I also enjoy tinkering with the environment to explore new possibilities and I feel confident to be able to restore anything I potentialy break.
I hope you found this article enjoyable and helpful in setting up a hassle-free, forget-about-it method for running and monitoring your backups.